

Instagrammable Places in Asia Map for Photo Routes and Timing to Try!
Introduction:
instaAsia is a treasure trove of visually stunning destinations, perfect for travelers who love capturing the perfect shot. From colorful markets and ancient temples to breathtaking landscapes and hidden viewpoints, knowing the best routes and timing makes all the difference. This guide highlights 25 Instagrammable places across Asia, complete with a handy map to plan your photo-friendly itinerary. Whether you’re chasing sunrise shots or exploring iconic landmarks, these spots ensure your travel feed will be filled with unforgettable, picture-perfect moments.
1) Angkor Wat, Cambodia — Sunrise Reflections Route
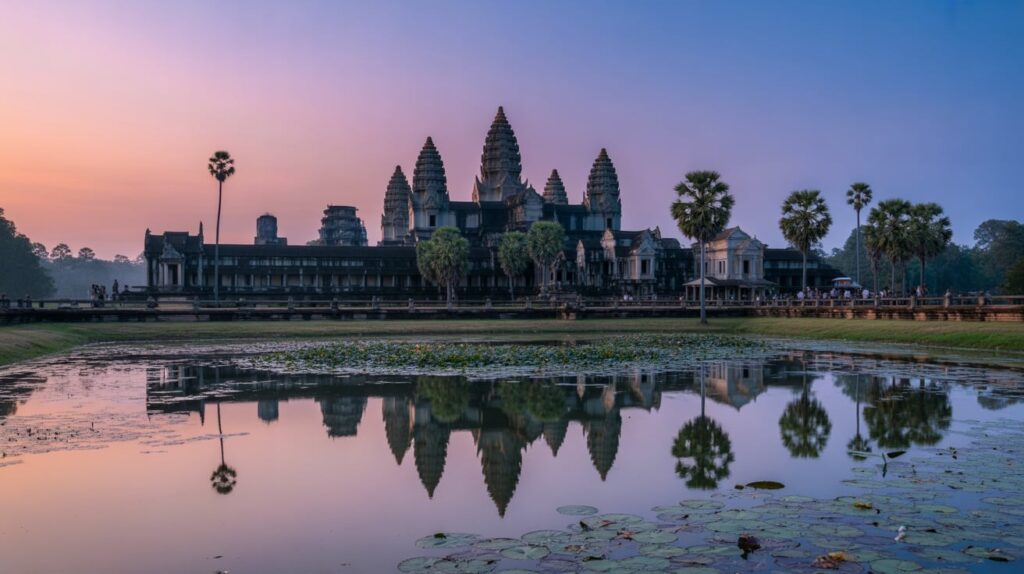
Start your photo route at the reflection ponds for the classic silhouette shot, then walk the causeway for wide symmetry frames. After the first light, move inside for carved-stone details and doorway framing shots that feel cinematic. Finish with a short loop to quieter corners where you can capture columns, long shadows, and scale without crowds. Keep your shots varied: one wide scene, one mid-range “walking” frame, and several close-up texture photos for a complete carousel.
Timing matters most here: arrive before sunrise to claim a reflection spot, then stay after the first glow for softer light and fewer rushed moments. If sunrise feels packed, plan a second session in late afternoon for warmer side light on façades and calmer pacing. Build your map with a “sunrise pond → interior details → shaded corridors” flow so you shoot in the best direction as the light changes. (katherinebelarmino.com)
2) Fushimi Inari, Kyoto, Japan — Torii Tunnel Loop
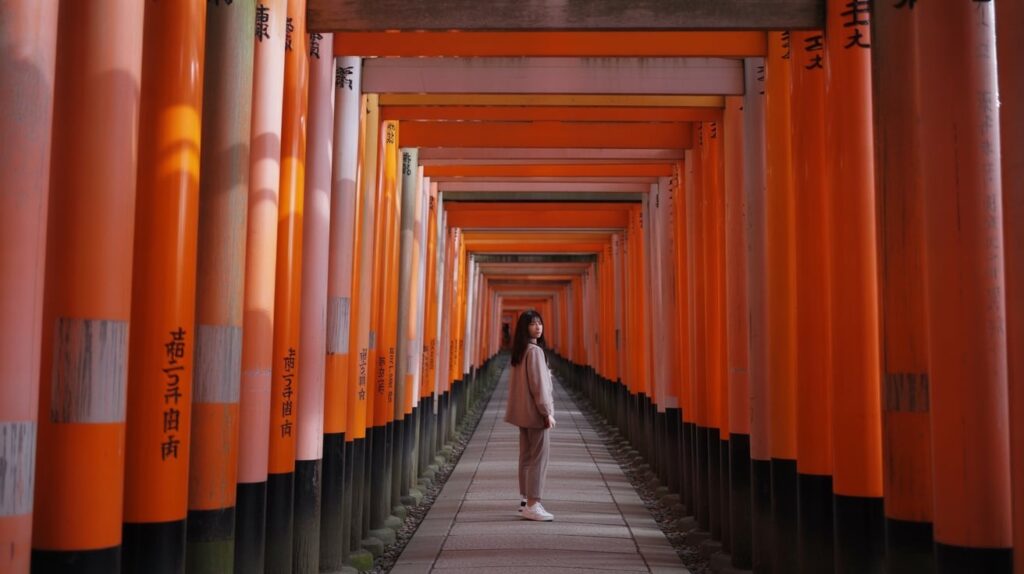
Begin at the main entrance for a clean “first gates” shot, then climb to the mid-level paths where the torii feel endless and more photogenic. Take slow, centered frames that emphasize repetition, then switch to side angles that show depth and texture. Add one portrait-style shot framed by gates, and one close-up of wooden plaques or lanterns to diversify your post. This route is simple, but it produces a full set of images quickly.
Go near dawn or after dark for the calmest photos and the clearest compositions. The shrine’s vibe changes by hour, so map two moods: sunrise for soft light and minimal foot traffic, and evening for lantern-lit drama. Keep your route timed as “entrance → mid-level torii → viewpoint pause → return,” so you avoid doubling back in peak crowds. A small tripod or steady grip helps in low light without rushing your shots. (Lions in the Piazza)
3) Arashiyama Bamboo Grove, Kyoto, Japan — Morning Green Corridor
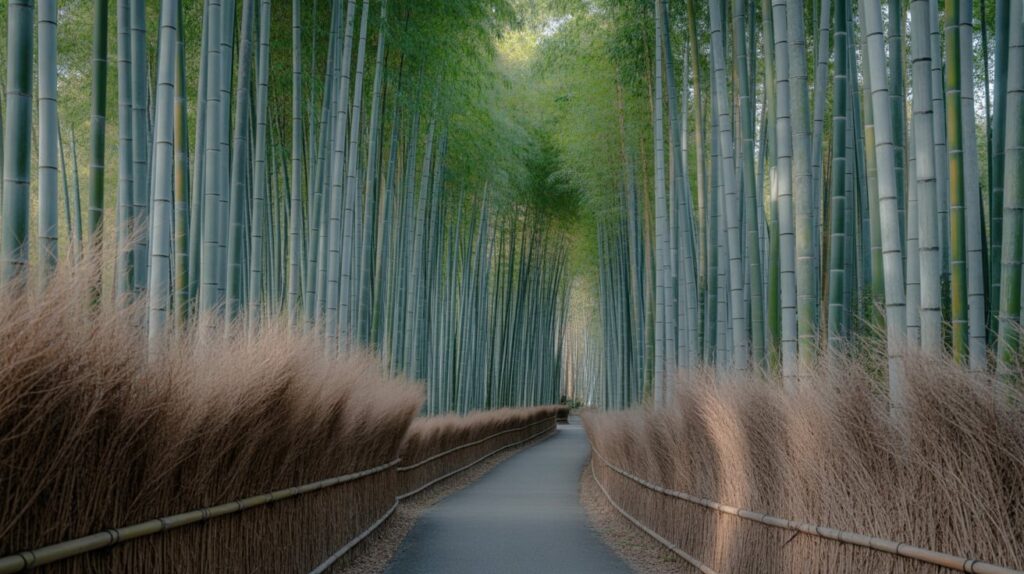
Start at the bamboo grove entrance for your hero vertical shot, then move deeper for tighter “tunnel” frames that show height and repetition. After you get the classic path photo, turn your camera upward for bamboo canopy shots that feel dreamy and abstract. Finish with nearby side paths for quieter portraits where the background stays clean. Keep clothing neutral or earthy so the green tones dominate, and shoot both wide and close to create a varied Pinterest carousel.
Arrive very early for the cleanest photos, then use mid-morning for café stops and detail content nearby. Your map works best as “bamboo first → temple garden second → riverside third,” so you capture serenity before foot traffic builds. If light gets harsh, shift to shaded angles and focus on texture: bamboo nodes, leaves, and soft backlit edges. A slow walk with planned stops keeps your gallery cohesive and prevents random, mismatched frames.
4) Chureito Pagoda + Mt. Fuji View, Japan — Sunrise-to-Midday Sequence
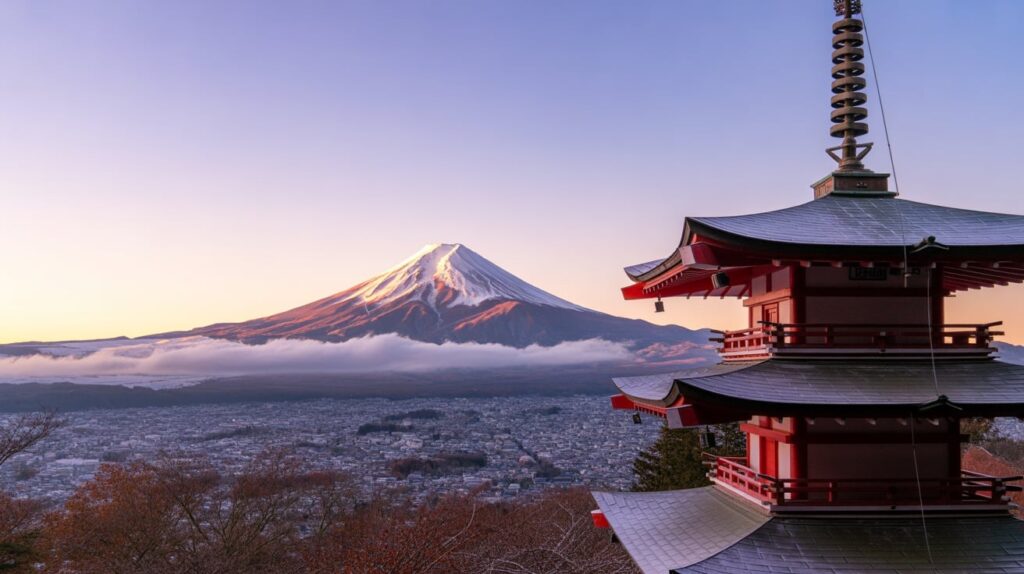
Begin at the lower steps for a “pagoda reveal” shot, then climb to the main platform for the famous layered composition. Take one wide frame that includes pagoda, city, and mountain, then capture tighter shots that isolate Fuji behind architectural lines. Afterward, walk down slowly and photograph the staircase from below for a strong leading-line image. This route creates variety without extra locations, and it’s perfect for a clean, iconic Pinterest post set.
Plan your timing around visibility: early morning often gives clearer air and softer color, while midday can flatten the sky. Build a backup window in your map, because clouds can hide the mountain and change the plan fast. If it’s hazy, pivot to detail shots of the pagoda and surrounding trees, then return later for the big view. Pack light layers so you can wait comfortably and shoot when the mountain appears.
5) Shibuya Crossing + Rooftop View, Tokyo, Japan — Street-to-Sky Route
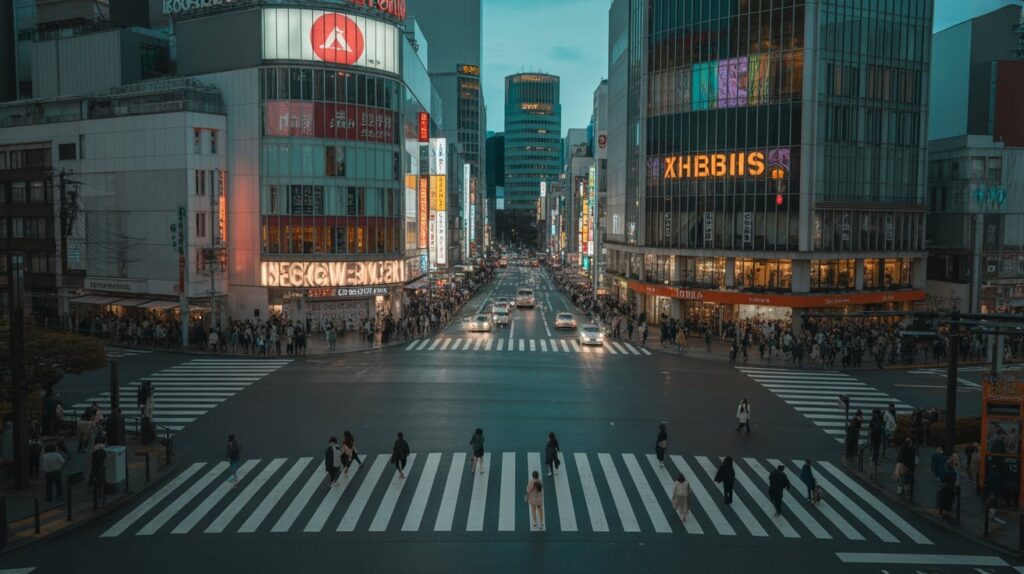
Start at street level for motion shots of the crossing, then move to a nearby elevated viewpoint for a clean overhead frame. Capture one “wide chaos” photo, then switch to close-ups: umbrellas, neon reflections, and signage details that scream Tokyo. After your skyline shot, walk a few blocks to find a quieter alley for portraits with glowing background lights. This route gives you both iconic scale and intimate street texture in one tight photo loop.
For the best look, aim for blue hour into early night when the sky still holds color and the signs glow brighter. Blue hour is short, so map your steps ahead: “crossing first → rooftop second → alley third,” with minimal downtime. A light drizzle can add reflections that upgrade your shots, but keep a small cloth for your lens. If crowds feel intense, take your photos in quick bursts and step aside to reset. (Digital Photography School)
6) Bukchon Hanok Village, Seoul, South Korea — Quiet Lanes Walk
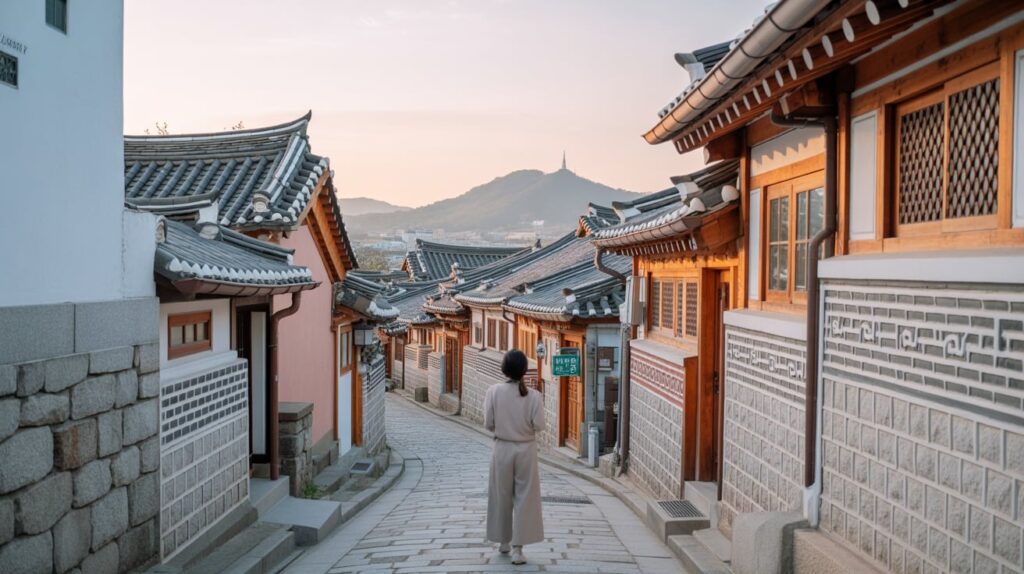
Begin with the higher viewpoints for rooftop layers, then wander down into quieter lanes for close, cozy frames. Look for wooden doors, stone walls, and gentle curves in the streets that create natural leading lines. Take one wide shot that shows rooftops, then switch to portrait framing in a side alley where the background stays minimal. Keep colors soft so the architecture reads clearly, and capture small details like lanterns and signage for a complete story set.
Visit early for calm streets and cleaner photos, then shift to cafés and shops after your main shots are done. Build your map as a short loop with one “viewpoint stop,” two “lane stops,” and one “rest stop” so you don’t rush. If you arrive later and it’s busy, focus on tight compositions that crop out crowds and emphasize textures. Slow walking, quiet corners, and gentle light make this place feel timeless on camera.
7) Seongsan Ilchulbong, Jeju, South Korea — Sunrise Peak Route
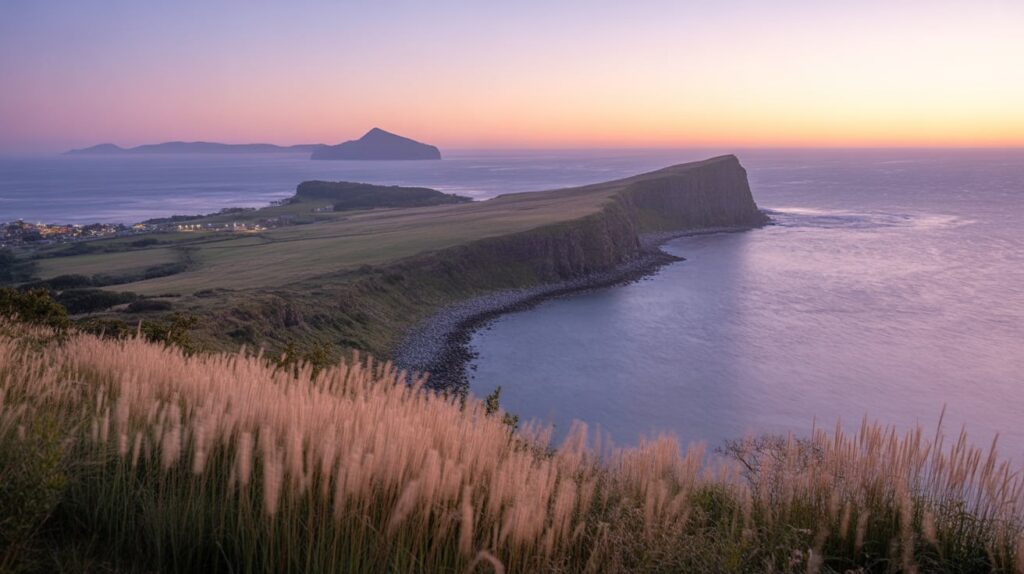
Start at the base for a silhouette shot of the crater against the sky, then climb steadily and pause at mid-level platforms for layered ocean views. At the top, capture wide horizon frames and a few close-ups of grasses or stone textures to vary your post. On the descent, photograph the path behind you for leading lines that naturally guide the eye. This route gives you a clear beginning, middle, and end that reads like a story in photos.
Time your hike so you reach the top before sunrise, then stay a bit after for warm light on the coastline. Map a follow-up stop at a nearby café or beach so you can reset and shoot a second mood in softer daylight. If it’s windy, keep hair secure and use your body as a shield for steadier shots. Choose simple layers that move well, because this location photographs best with motion and open space.
8) Jiufen Old Street, Taiwan — Lantern Alley + Teahouse Views
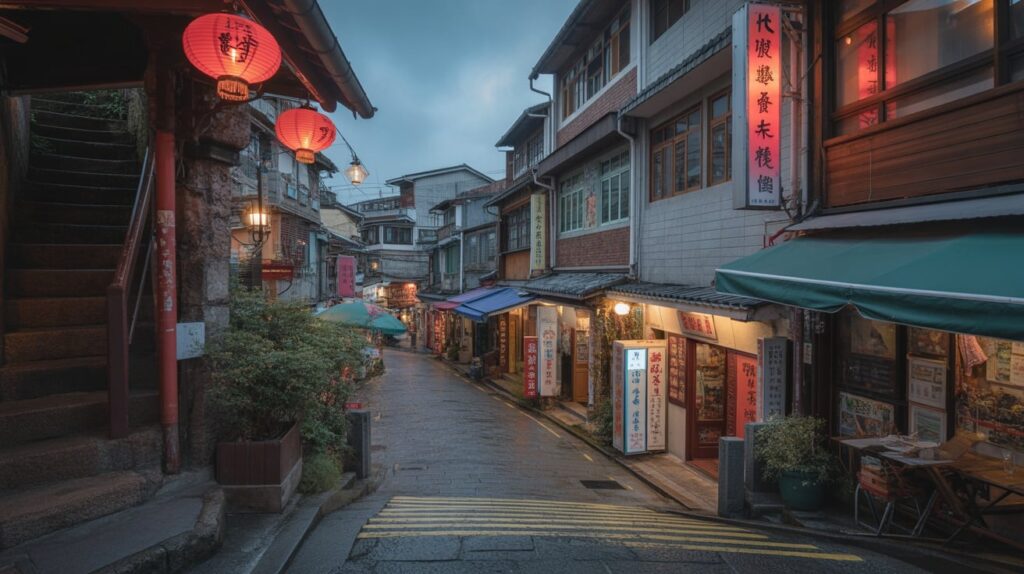
Begin at the main lantern steps for your signature vertical photo, then weave into side alleys for tighter shots of signs, windows, and food stalls. Aim for layered frames where lanterns stack into the distance and create depth. After your alley photos, head to a teahouse viewpoint for wide shots of hills and town lights. Mix one wide scene with several close-ups of lantern glow and textures, so your carousel feels rich and immersive.
Plan for late afternoon into early night, when lanterns glow but the sky still has color. If it rains, the reflections on stone steps can make your photos even more dramatic, so keep a small umbrella and lens cloth ready. Map your route as “lantern stairs → side alley loop → viewpoint teahouse,” and repeat the stairs at the end if crowds thin. Warm indoor stops keep hands steady and help you pace your shoot.
9) Elephant Mountain, Taipei, Taiwan — Skyline Hike Timing
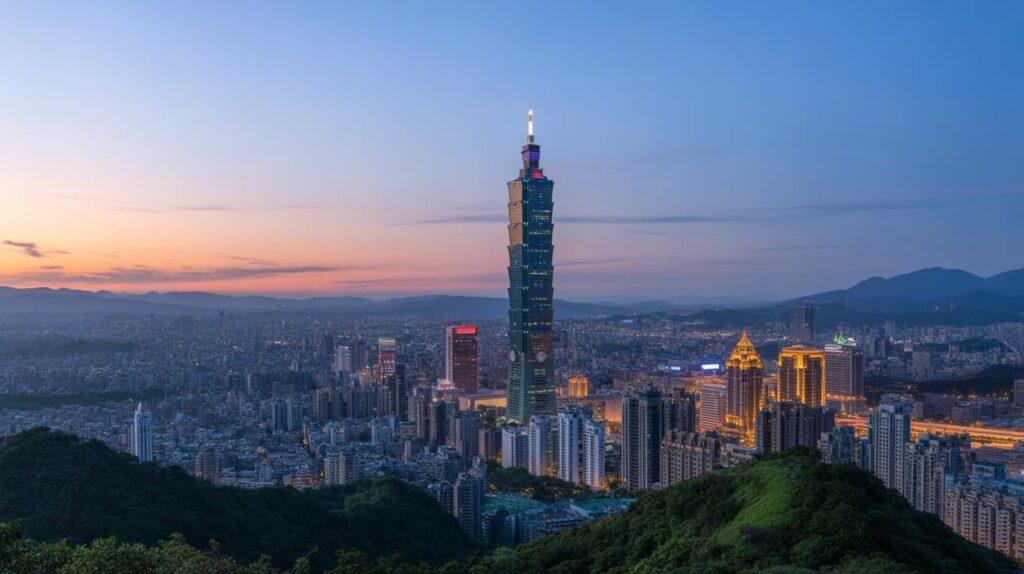
Start your hike with a simple goal: one skyline hero shot from the most popular rock platforms, then a few side angles that include more hills for depth. Capture one wide skyline frame, one tighter frame focusing on Taipei 101, and one portrait-style shot with the city behind you. On the way down, shoot the stair trail for a “journey” image that adds variety. This route is short but delivers high-impact city visuals.
Arrive before sunset so you can claim a spot and shoot through the light change into blue hour. Blue hour makes city lights look crisp while the sky stays deep and colorful, which reads beautifully on Pinterest. (Digital Photography School)
Map your timing as “sunset warm tones → blue hour glow → quick night frames,” then leave before it gets too dark. Bring water, keep footwear steady, and plan a post-hike food stop nearby so the day feels like a complete photo itinerary.
10) Victoria Peak, Hong Kong — Tram + Skyline Loop
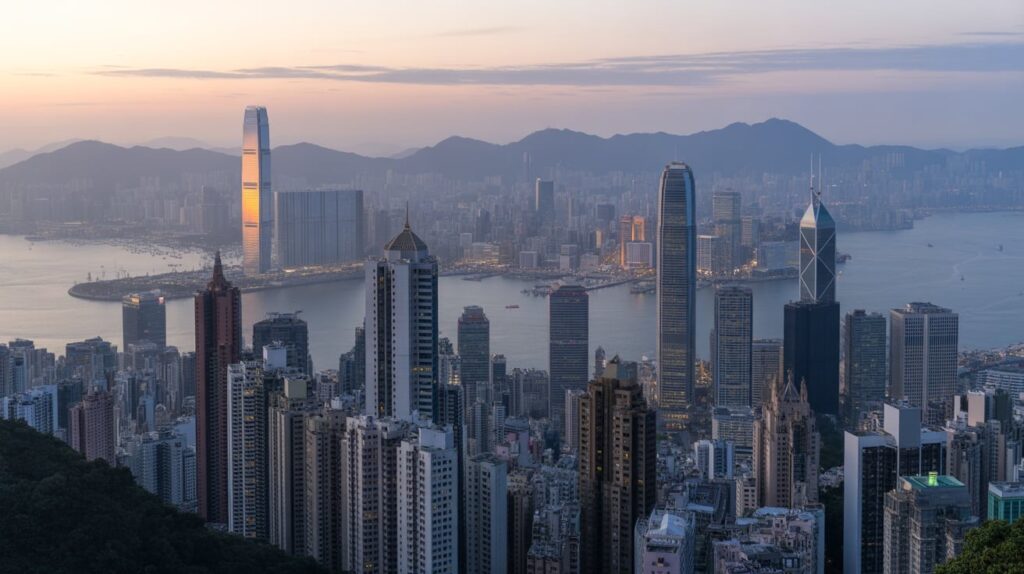
Start with a wide skyline shot from the main viewing area, then move a few minutes away for cleaner compositions with fewer people. Take one “harbor curve” frame, one tight city-density frame, and a portrait shot with lights behind you. After your peak photos, walk a short loop for alternate angles that include trees and railings as foreground. This adds depth and makes your photos feel more editorial than purely postcard.
Plan to arrive before sunset and stay through blue hour for the best mix of sky color and city lights. Build your map around the light window: “arrive early → scout angles → shoot sunset → shoot blue hour → descend.” Blue hour is brief, so keep your camera settings ready and your composition simple. (Digital Photography School)
If visibility is hazy, focus on moody silhouettes and light trails rather than chasing sharp detail.
11) The Bund, Shanghai, China — Riverside Walk + Night Glow
Begin your route on the promenade for wide skyline shots, then walk along the river to find a spot with clean rail lines and fewer distractions. Capture the contrast between historic buildings on one side and modern towers on the other for a strong “old meets new” story. Add close-ups of reflections, signage, and street details to make your carousel feel lived-in. This place is made for vertical framing because the skyline stacks beautifully from water to sky.
Aim for sunset into night so you get both softer sky tones and bright city lights. Map your steps as “golden hour architecture → twilight skyline → night reflections,” with short stops in between for steady shots. Blue hour adds richness to the skyline without the flat black sky look. (Digital Photography School)
If it’s crowded, shoot tighter reflections and use foreground people as silhouettes for atmosphere instead of fighting for an empty frame.
12) Zhangjiajie National Forest, China — Pillars and Mist Route
Start your route with the highest viewpoints for layered pillar shots, then move down to trails where you can frame peaks through trees. Capture one wide misty panorama, then switch to tighter compositions that isolate a single pillar group for a minimalist look. Include a scale element—tiny people, a path curve, or a railing edge—so the height feels dramatic on camera. This place rewards slower photography, where you wait for fog breaks and shoot in bursts.
Morning often gives the best mist and the softest light, so plan your map around early starts and fewer locations. Build a flexible route with two viewpoints and one short trail, rather than trying to see everything in one day. If the sky clears, pivot to shadow-and-contrast shots that emphasize the pillars’ shapes. Pack a light jacket, because humid fog can feel chilly, and keep your lens clean so mist doesn’t soften every frame unintentionally.
13) Ha Long Bay, Vietnam — Cruise Deck Photo Circuit
Start on the upper deck for wide karst silhouettes, then move to the side railings for layered depth shots that include boat lines in the foreground. Capture one “open water” frame, one tight karst cluster frame, and several detail shots of life on board, like hands holding coffee or wind in hair. If you stop at a viewpoint or cave, plan one portrait shot there for variety. The goal is a balanced set: landscape, lifestyle, and texture.
Timing is everything on the water, so map your photo moments around sunrise and late afternoon when light is soft. Midday can be bright and flat, so save that time for relaxing, food, and quick detail shots. Build a simple “sunrise deck → mid-morning activity → sunset deck” rhythm, then add blue hour for twinkling boat lights if conditions are calm. (Digital Photography School)
Pack a light layer and keep your camera ready, because the best scenes appear fast.
14) Hoi An, Vietnam — Lantern Streets + River Reflections
Begin your route in the older lanes for lantern overhead shots, then walk toward the river for wider frames with reflections and boats. Capture one hero image on a lantern street, then collect detail shots: lantern textures, food, and window light. Add a portrait near a bridge or riverside railing for a clean background that still feels iconic. Hoi An photographs best when you keep compositions simple and let the warm light do the storytelling.
Arrive before dark to scout angles, then shoot through dusk into early night when lanterns glow strongest. Map your timing as “late afternoon architecture → dusk lantern streets → night river reflections,” with a short break for a drink or snack. If crowds get heavy, step into side alleys for cleaner frames, then return to the main streets when the flow shifts. A slow loop keeps your content cohesive and avoids random, disconnected photos.
15) Wat Arun, Bangkok, Thailand — Riverfront Golden Hour
Start your route on the opposite riverbank for wide temple shots, then move closer for detail photos of tiles, arches, and ornate patterns. Capture one wide skyline-style frame, then switch to close-ups that show texture and craftsmanship. If you take a boat crossing, use it as a “moving shot” moment for candid video or photos with the temple behind you. This location offers both epic distance views and intricate detail, which makes your post feel complete.
Plan for late afternoon into blue hour so the temple transitions from warm light into evening glow. Map your sequence as “daylight details → golden hour wide shot → blue hour river reflections,” then finish with a food stop nearby. Blue hour helps the sky stay rich while lights come on, which elevates your river photos. (Digital Photography School)
Bring a small cloth for humidity on lenses, and keep your route simple so you don’t waste the best light window moving too far.
16) Chiang Mai, Thailand — Temple + Old Town Café Loop
Start with a temple visit in the morning for clean photos and softer light on gold details. Capture one wide courtyard shot, then focus on symmetry: doorways, staircases, and repeating patterns. After your temple frames, walk into Old Town for café content that balances your set with lifestyle shots. A good map here is “temple first → quiet lane portraits → café detail shots,” so your feed feels varied but still cohesive in color and mood.
Plan your timing early for temples, then late morning for cafés when light is brighter and food looks best. If you want a second photo session, return for sunset on a viewpoint or a quiet street with warm light. Keep shoulders covered where appropriate, and choose breathable fabrics so you’re comfortable while walking. This city is ideal for short routes with frequent stops, because you can shoot, rest, and shoot again without long travel time between scenes.
17) Marina Bay, Singapore — Skyline Circuit + Gardens Glow
Start at the waterfront for wide skyline photos with reflections, then walk toward the architectural highlights for closer frames that feel modern and clean. Capture one “full bay” shot, one tight skyline crop, and a few lifestyle photos with a drink or coffee in hand. After the skyline set, shift to Gardens by the Bay for a second visual style: glowing structures, lush plants, and futuristic lines. This map gives you two strong photo themes in one easy evening route.
Time your route for sunset into blue hour, because the sky color makes city lights look richer and more cinematic. Blue hour is short, so plan your stops in advance: “waterfront first → bridge angle second → gardens last,” with minimal delays. (Digital Photography School)
If you want more night drama, stay a bit longer for deeper contrast, but get your key shots while the sky still holds color. A small tripod helps for crisp reflections.
18) Kuala Lumpur, Malaysia — Petronas Towers + Night Walk
Begin with a wide shot that captures both towers and the plaza, then move closer for vertical frames that emphasize height. Look for reflective surfaces, fountains, or polished stone that can double the lights in your composition. After your main tower photos, take a short city walk to capture street scenes, café lights, and urban textures that complete the story. Mixing landmark shots with everyday details makes your carousel feel like a real itinerary, not just a single postcard.
Plan for early evening so you can shoot the towers as the sky darkens and the lights come on. Map your timing as “golden hour wide → blue hour reflections → night detail walk,” with a short break for water and battery checks. (Digital Photography School)
If the plaza is busy, shoot upward from a lower angle to crop crowds out naturally. Keep your outfit simple so the towers stay the focus and your photos look clean and high impact.
19) Lempuyang “Gates of Heaven,” Bali, Indonesia — Sunrise Queue Strategy
Start your route with the main gate composition, then capture a second angle from slightly off-center so you have variety beyond the classic frame. After your gate photo, move to nearby temple areas for calmer shots of stone details, steps, and mountain air. Include close-ups of carvings and offerings to make your post feel more like a full experience. Keep your outfit simple and respectful, and plan a few portrait shots that use the gate as a strong, symmetrical frame.
Go early for cooler weather and smoother logistics, because this spot can involve waiting. Some popular reflection-style photos are created with a mirror effect rather than a natural pool, so set expectations and focus on clean composition instead of chasing one specific “viral” look.
Map your day as “gate first → quieter temple details second → scenic drive stop last,” so you leave with a full set even if the main photo takes time.
20) Tegalalang Rice Terraces, Bali, Indonesia — Morning Light Walk
Start at a high viewpoint for layered terrace shots, then walk down into the fields for path-level photos that show scale and texture. Capture one wide “green waves” frame, then shoot tighter on patterns, water reflections, and palm silhouettes. Include a walking shot on a narrow ridge path for a strong storytelling image. Keep your outfit in light neutrals or soft earth tones so it contrasts gently with the bright greens without feeling overly bold.
Go early for softer light and calmer paths, then plan a breakfast stop afterward while the sun gets harsher. Map your route as “viewpoint first → terrace paths second → café third,” so you shoot the best visuals before crowds build. If you’re filming, use slow pans across the terrace layers for smooth, satisfying clips. Bring insect repellent and a light layer for humidity changes, and keep your steps careful on narrow paths to stay steady for photos.
21) El Nido Lagoons, Palawan, Philippines — Kayak Photo Flow
Start your photo route from the boat with wide cliff shots, then switch to kayak-level photos that feel immersive and personal. Capture one wide lagoon frame, one close-up of paddle splashes, and one portrait with the cliffs towering behind you. Look for small coves where the water turns glassy for reflections and calmer compositions. The best photos here mix scale and detail, so don’t only shoot the big view; shoot texture, water color, and movement.
Plan your timing early or late for softer light and fewer harsh highlights on the water. Map the day as “arrival wide shot → kayak into lagoon → short swim break → exit wide shot,” so you capture the full story in order. If midday sun is strong, focus on shaded areas near cliffs for richer color and less glare. A waterproof pouch keeps your phone safe, and a simple neutral swimsuit reads clean and timeless in photos.
22) Chocolate Hills, Bohol, Philippines — Sunrise Viewpoint Map
Start at the main viewpoint for a sweeping panorama, then move slightly along the platform edges to find cleaner compositions. Capture one wide “endless hills” shot, then take tighter crops that emphasize repeating shapes. Add a portrait with a small figure against the hills to show scale, and include a few close-up details like steps, railings, or morning fog. Repetition is the visual magic here, so keep your framing clean and let the pattern be the focal point.
Arrive early for softer color and the calmest atmosphere, then plan a breakfast stop to reset before continuing your route. Map your timing as “sunrise viewpoint → quick portrait session → mid-morning countryside stop,” so your day feels like a full photo itinerary. If the light gets flat, use silhouettes or include foreground framing to add depth. Bring a light jacket for the breeze, and keep your gear simple so you can move quickly between angles.
23) Sigiriya Rock Fortress, Sri Lanka — Climb + Viewpoints Plan
Start your route at the base for the iconic “rock rising” shot, then climb with planned pauses at viewpoints for layered jungle frames. Capture one wide landscape, one mid-range shot showing the staircase lines, and a few close-ups of stone textures and surrounding greenery. At the top, focus on panoramic shots that show the vastness, then finish with a slow descent capturing leading lines behind you. This creates a strong, story-driven carousel from start to summit.
Go early to avoid heat and to photograph in softer light on the rock and jungle. Map your timing as “base wide shot → mid-climb viewpoints → summit panorama → descent details,” with water breaks built in. Wear grippy shoes and keep your bag light so you can shoot steadily on steps. If the summit is busy, take tighter panoramas that crop crowds out and prioritize the horizon lines, which make the scene feel massive and calm.
24) Taj Mahal, Agra, India — Sunrise Symmetry Route
Begin with the classic centered view near the reflecting pool for symmetry, then move to side gardens for softer angles and fewer people in frame. Capture one wide “full monument” shot, one close-up of marble details, and one portrait framed by an archway for variety. Walk slowly and look for repeating patterns in inlay work and door frames, because those detail shots make your carousel feel premium and complete. This route stays simple and produces consistently strong photos.
Sunrise is popular for good reason: cooler air, softer light, and generally calmer vibes than midday. (globetrottingsu.com)
Map your timing as “entry → main symmetry shot → side gardens → archway frame,” so you hit the best compositions before crowds thicken. If you want a second look, return later for warmer tones and different shadow patterns, but keep your key shots early. Stay alert for unofficial “help” offers around major landmarks and stick to straightforward plans. (The Times of India)
25) Registan Square, Samarkand, Uzbekistan — Blue Hour Architecture Walk
Start with a wide frame that captures the full square’s symmetry, then move closer for tilework and arch details that look incredible in vertical crops. Take one “centered facade” photo, one angled shot that shows depth, and several close-ups of patterns for a textured carousel. If you can, include a small human figure at a distance for scale. This location rewards slow, careful framing, because the architecture is the subject and every line matters.
Plan your shoot for the transition from sunset into blue hour, when the sky turns deep and the building lights feel balanced, not harsh. (Digital Photography School)
Map the timing as “sunset scouting → blue hour wide shots → night detail close-ups,” so you capture both mood and texture. If the square is busy, wait a few minutes for clear gaps and shoot in short bursts. Keep your outfit simple and dark-toned so it doesn’t clash with the tile colors, and bring a steady support for sharp low-light frames.
Conclusion:
Visiting Instagrammable places in Asia is all about timing, perspective, and exploration. With this guide and map, you can plan routes that maximize photo opportunities while discovering the continent’s vibrant culture and landscapes. From iconic landmarks to hidden gems, each location offers unique moments to capture. Following these tips ensures your trip is both visually stunning and well-organized, leaving you with a collection of memories and images that showcase the best of Asia.