

Plan these like a photo scavenger hunt: pick 6–8 ideas for one day, save the rest for your next visit, and use PhotoPass or a friend for full-body shots. Keep it respectful and safe—stay out of restricted areas, don’t block walkways, and follow Cast Member instructions.
1) Rope Drop Main Street Stroll Shot
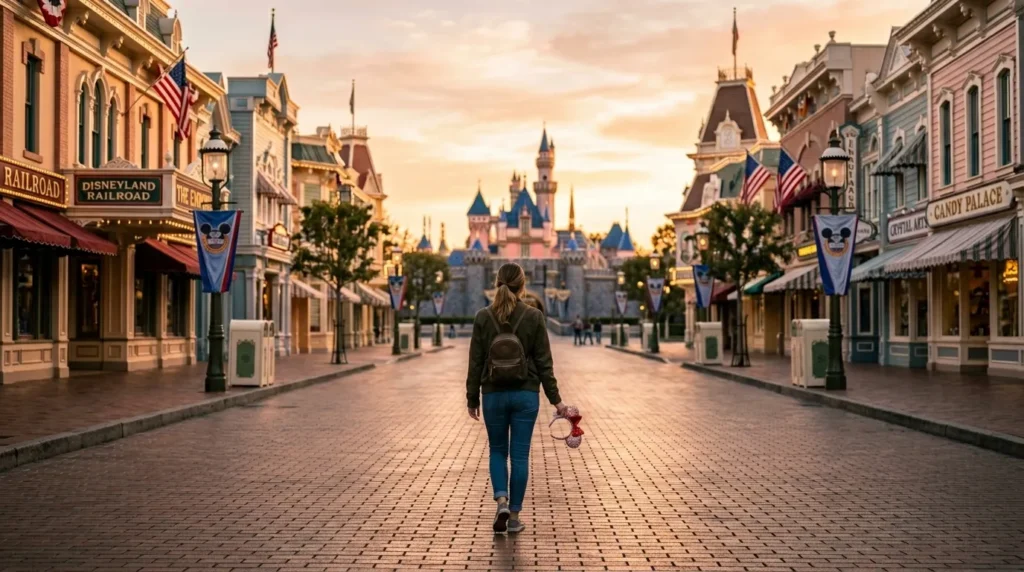
Arrive early and capture the “first steps of the day” feeling on Main Street. Walk slowly toward the castle while someone shoots from behind at waist height for a flattering, candid look. Checklist: relaxed shoulders, gentle arm swing, ears or hat in hand, smile like you’re mid-laugh. This works best when the street is quiet and the light is soft, so you get that dreamy, calm Disneyland mood without crowds.
In your second set, flip the angle and shoot toward the entrance with the train station in the distance. Try a “look-back” pose—turn your head over one shoulder while still walking forward. Keep your outfit colors simple so the street’s colors pop in your photo. If you want extra magic, hold a coffee or park map as a prop. Take a short burst of photos to catch natural movement.
2) Disneyland Railroad Station Balcony Overlook
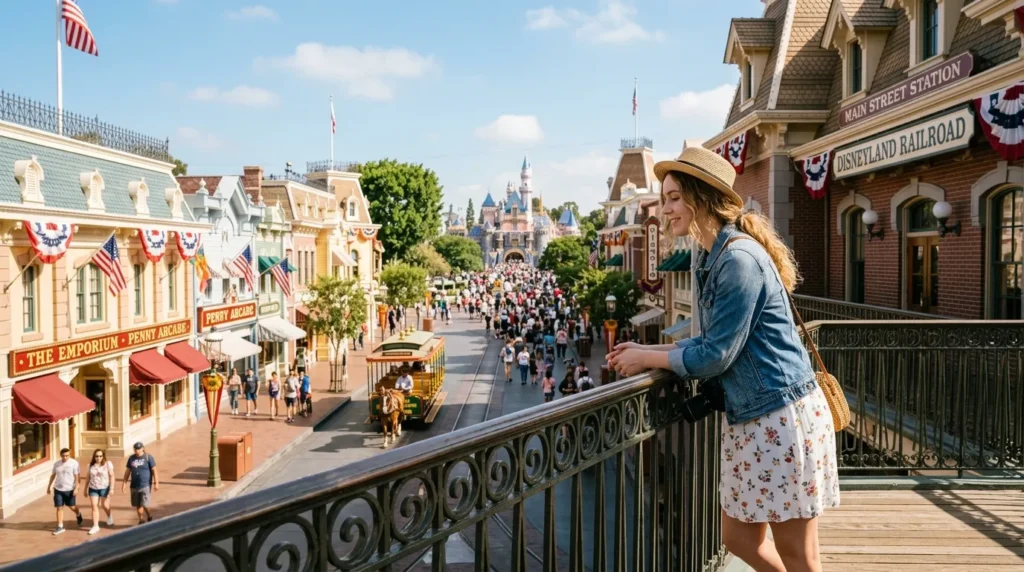
Head up to the Main Street Station area for a high-angle shot that instantly looks like a postcard. Pose with elbows lightly on the railing, chin slightly down, eyes looking toward the castle for a thoughtful travel vibe. Checklist: clean background, hands relaxed, posture tall, minimal clutter in the frame. This spot feels special because it shows the park’s “welcome” energy and gives your photo depth with the street stretching below.
For variety, take a second photo with a playful pose: point your toes slightly inward, tilt your head, and hold your Mickey ears or a balloon string. Ask your photographer to zoom slightly so the details stay crisp while the street softly blurs. If it’s crowded, shift a few steps to frame the shot between posts. Keep the walkway clear and be quick—this is a popular pass-through area.
3) Sleeping Beauty Castle Archway Peek-a-Boo
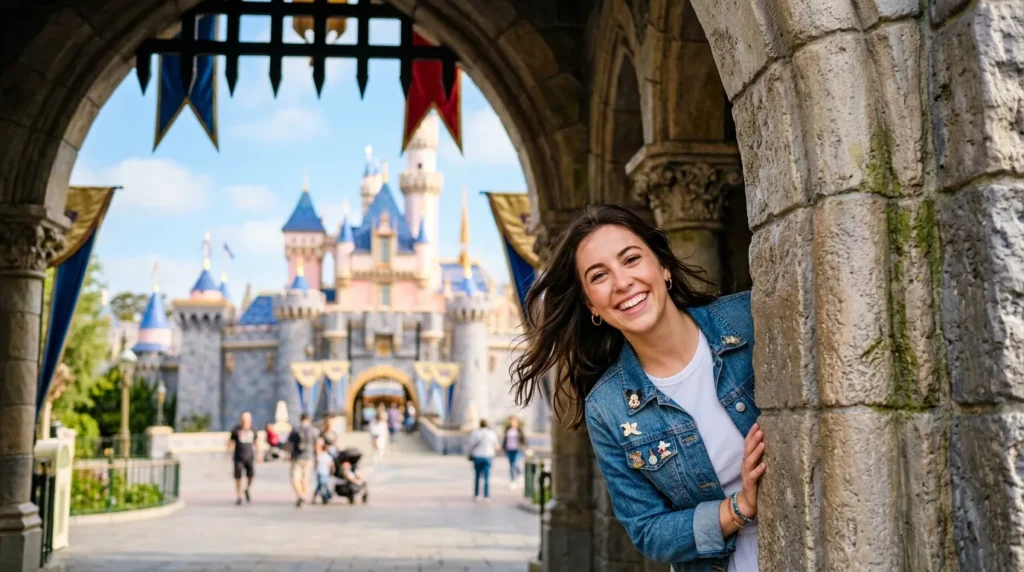
Use the castle arch like a natural picture frame. Stand just inside the arch, lean your shoulder against the stone, and peek out with a playful expression. Checklist: one foot forward, slight bend in the knee, hands gently holding the edge of the arch, eyes toward camera. The stone texture adds depth, and the framing makes your photo feel intentional without needing any props or complicated posing.
For your second paragraph shot, switch to a “walk-through” moment. Start a few steps back and walk under the arch while the camera captures you mid-step. Keep your arms loose and let your outfit move naturally. If the walkway is busy, wait for a clear moment so you’re not blocking traffic. A slightly lower camera angle makes the arch feel taller and more magical, especially if your photographer steps back a bit.
4) Castle Bridge Twirl
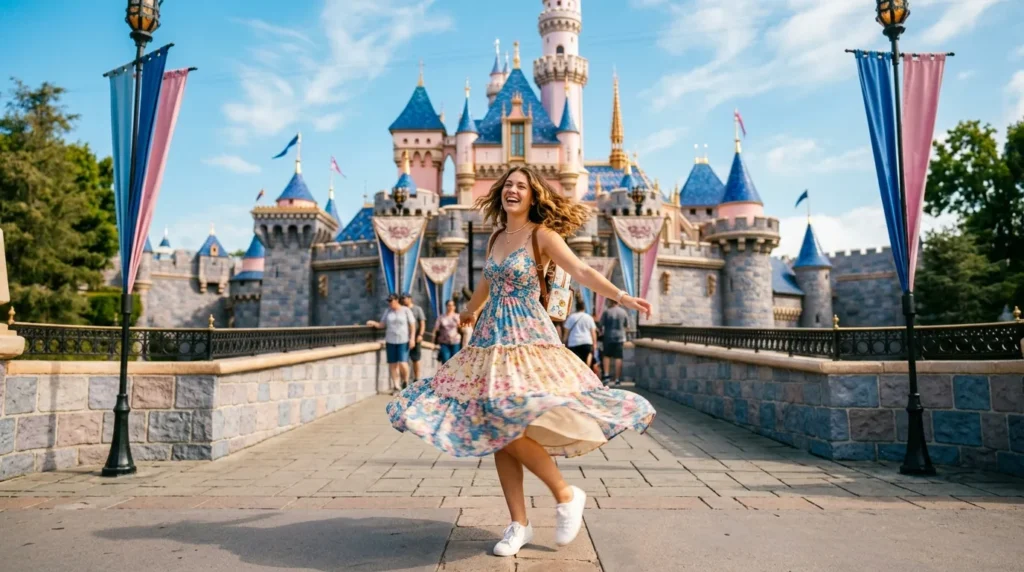
The bridge in front of the castle is perfect for motion shots. Wear something that moves—a skirt, dress, or light jacket—and do a slow twirl while your photographer uses burst mode. Checklist: chin up, soft smile, arms slightly away from body, twirl in one direction, pause at the end. The goal is a “caught in the moment” look, not a perfect spin. Try this early or late to reduce crowd clutter.
For the second look, turn the twirl into a “walking twirl.” Take three steps forward, then do a half-spin and stop with your shoulders angled toward the camera. This gives you both movement and a flattering final pose. If you don’t want to twirl, do a gentle skirt-swish with one hand. Keep the bridge area flowing—step to the side between takes so you’re not holding up foot traffic.
5) Castle Moat Reflection Shot
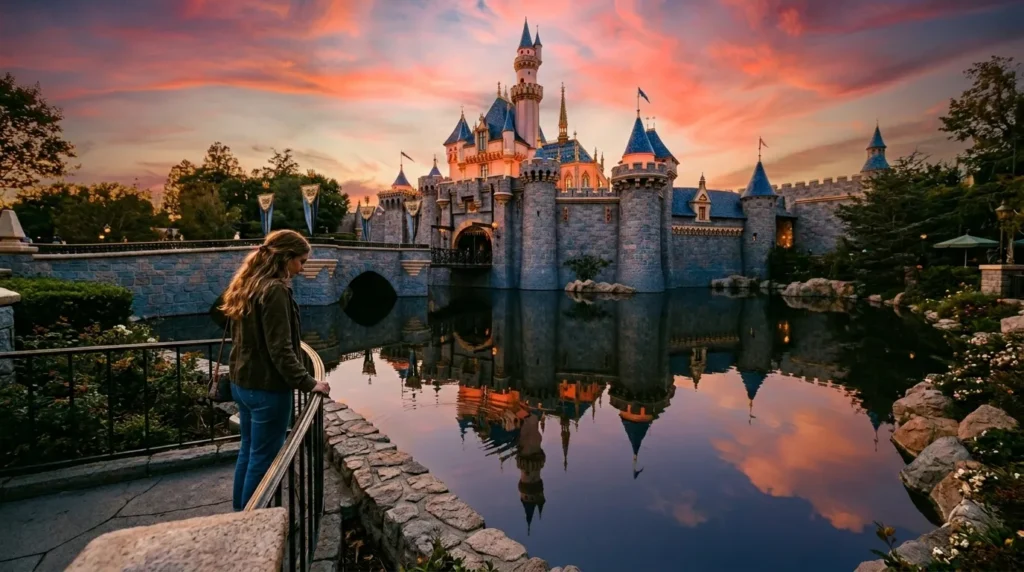
Look for reflective water near the castle and use it to double the magic. Position your subject so the castle reflection sits below them in the frame, then have them look down as if admiring the view. Checklist: phone away, shoulders relaxed, feet still to avoid ripples, slight tilt of head. This creates a calm, storybook feel that’s different from the classic “smile at the castle” pose.
Next, try a reflection “shoe tip” shot: capture just the lower half of your outfit and the reflection for a stylish, editorial vibe. If the water is rippling, wait a moment for it to settle or shoot several frames until you catch a clean reflection. Keep the camera low and steady. If you’re using a phone, tap to expose for the brighter castle so details don’t wash out in the sky.
6) Partners Statue Wide + Low Angle
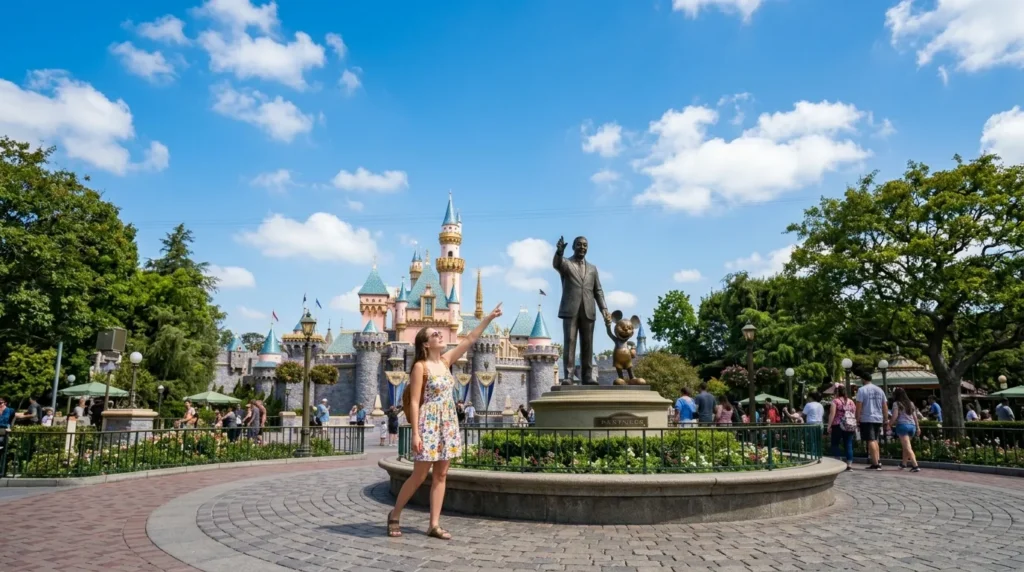
Use a wide shot near the Partners Statue to capture scale and classic Disneyland storytelling. Stand slightly off-center so the statue and castle remain visible, then do a simple pose: one hand holding your ears, the other loosely at your side. Checklist: open stance, weight on one leg, face angled toward light, no stiff arms. A lower camera angle makes the castle feel taller and gives your photo that iconic “I made it” energy.
For your second pose, try the “hand-in-hand” illusion: extend your hand toward the statue (without touching or climbing), as if you’re walking together. Keep it subtle and respectful, and don’t block others who want a quick photo. Ask your photographer to step back and zoom slightly so your hand looks proportional. This is also a great spot for a quick PhotoPass shot if you want a crisp, centered classic.
7) Mickey Balloon Pop With the Castle
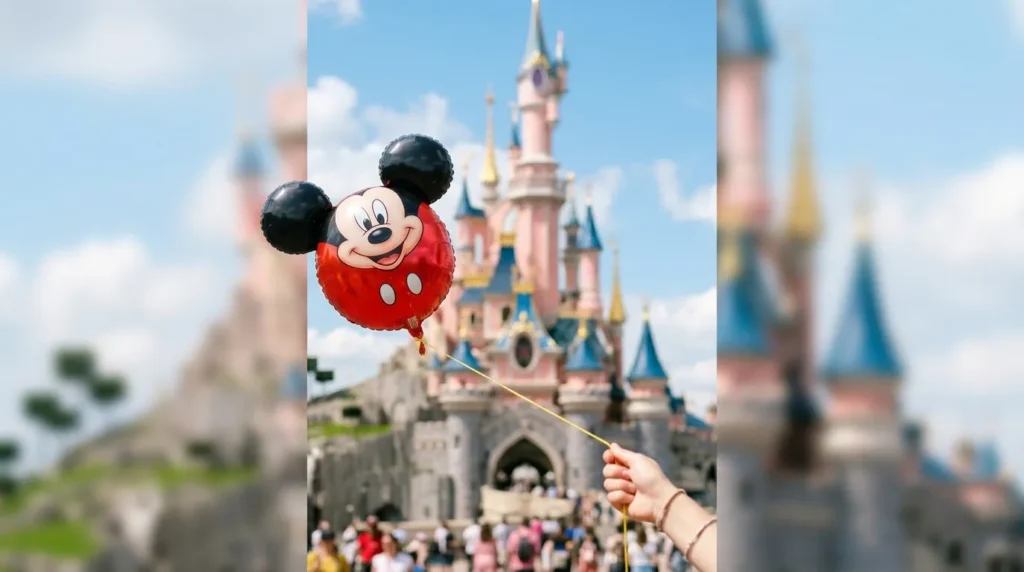
Mickey balloons are instant Pinterest gold—use them as the foreground “hero.” Hold the balloon slightly in front of you so it fills a big part of the frame, and let the castle blur behind it. Checklist: balloon centered, your face peeking beside it, eyes smiling, chin slightly forward. This makes a fun, colorful shot even if the area is busy. The balloon acts like a visual filter that hides background crowds.
For variation, turn the balloon sideways and shoot from a slightly lower angle so it looks larger than life. Try a candid laugh and look up at the balloon instead of at the camera. If you’re with a friend, do a balloon “swap” shot—each person holds their balloon toward the center so the two balloons frame the castle. Keep your grip secure and stay out of walking lanes while you set up.
8) King Arthur Carrousel Golden Spin
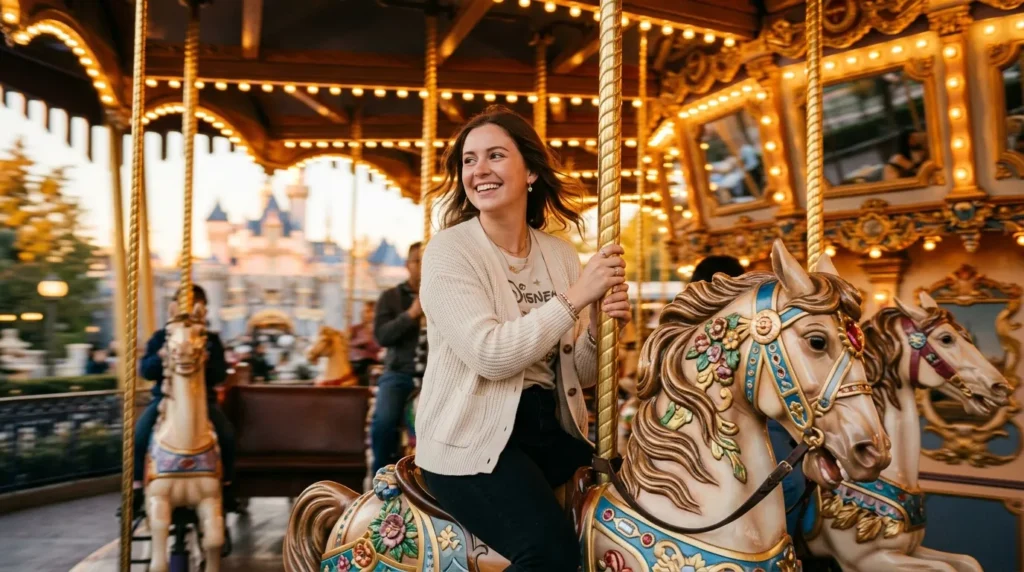
Carousel photos feel timeless because they’re bright, playful, and full of detail. Choose a horse near the edge for better angles and ask your photographer to stand outside the ride line for a clear frame. Checklist: one hand on the pole, shoulders turned slightly, chin up, relaxed smile. If you want a dreamy look, ask for a touch of motion blur while keeping your face sharp by shooting in burst mode.
For the second shot, go for a close-up: hands on the pole, a small smile, and your ears or headband visible. Let the horse details—gold trim, saddle, and colors—do the heavy lifting. If you’re wearing a skirt, keep it tidy and comfortable. Avoid exaggerated poses that could be unsafe on a moving ride. One clean, happy moment usually beats a complicated setup here.
9) Dumbo Low-Angle “Flying” Shot
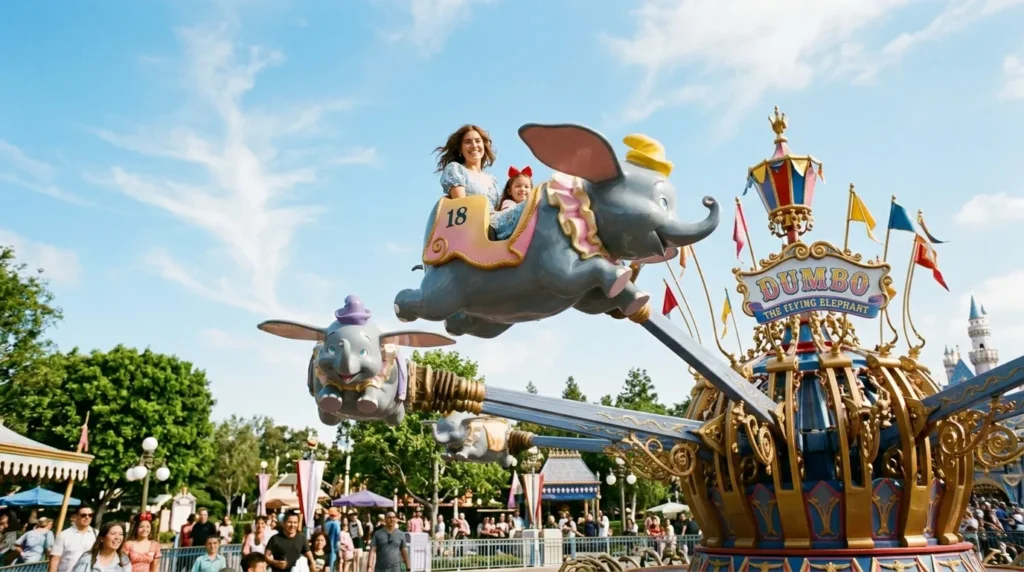
Dumbo photos look best when you lean into the “I’m flying!” theme. Have your photographer shoot from below, framing your Dumbo vehicle against the sky. Checklist: one hand waving, the other holding the bar safely, big smile, eyes looking down toward the camera. This angle makes the ride feel higher and more cinematic. If it’s sunny, wear sunglasses for a cool vacation vibe or skip them for a more classic, expressive look.
For your second pose, do a gentle “storybook gaze.” Look outward toward the horizon instead of directly at the camera, like you’re spotting Neverland. Ask your photographer to capture a few shots as you rise and fall—timing matters. Keep your hands and body safely inside the ride. A bright sky background keeps the photo clean and minimal, which is perfect for Pinterest-style pins.
10) Mad Tea Party Motion-Blur Swirl
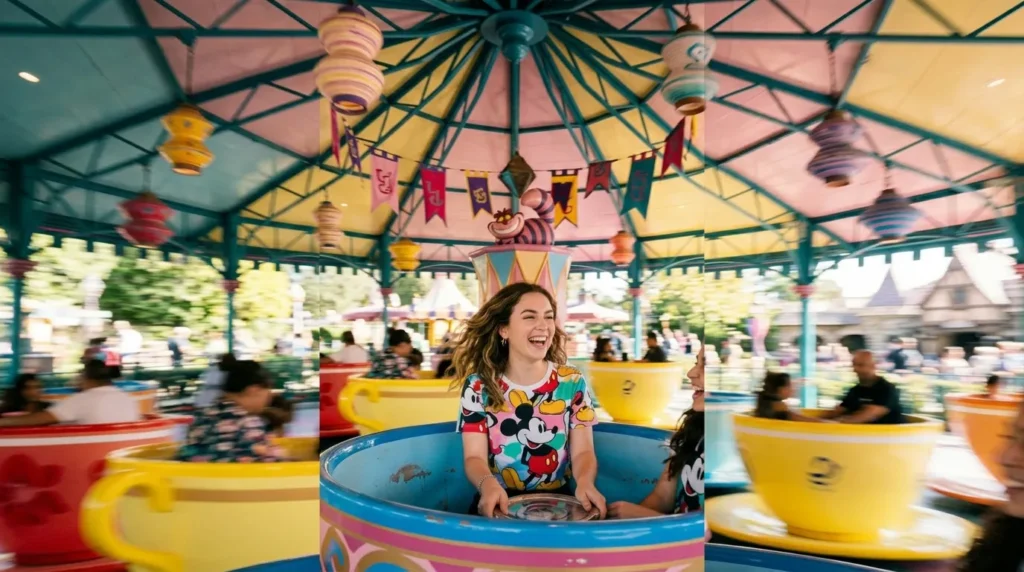
Teacups are made for dynamic photos. Ask your photographer to stand outside the ride and shoot while you spin gently—enough for blur, not enough to feel sick. Checklist: face toward camera on each pass, hands placed safely, smile or laugh, hair tucked if windy. The goal is a sharp subject with a colorful blurred background. Burst mode helps catch the moment when your face is clearest.
For the second shot, do a “hands-on-the-wheel” close-up. Lean forward slightly, keep your elbows relaxed, and smile like you’re mid-spin. If you’re with friends, do a group shot where everyone leans in and laughs naturally—those always look more real than posed smiles. Keep it quick so you’re not stressing about the perfect frame. The motion is the magic here.
11) Storybook Land Miniature Magic

Storybook Land is full of tiny details, so make your photo feel like you “found” a mini world. Stand near the attraction exterior or nearby viewpoints and do a simple pointing pose toward a miniature scene. Checklist: point with a relaxed hand, eyebrows lifted, smile like you’re surprised, camera at chest height. The mini buildings and bright colors create a playful background that looks great on Pinterest boards.
For a second photo, switch to an “observer” vibe—hands on the rail, chin resting lightly on your knuckles, eyes focused on the mini scene. This reads more cinematic and less touristy. If you’re shooting from a boat, be respectful and keep your phone secure; don’t stand or lean dangerously. A short caption idea for your pin: “Tiny details are the real magic.” It fits the mood perfectly.
12) “it’s a small world” Color Pop Pose
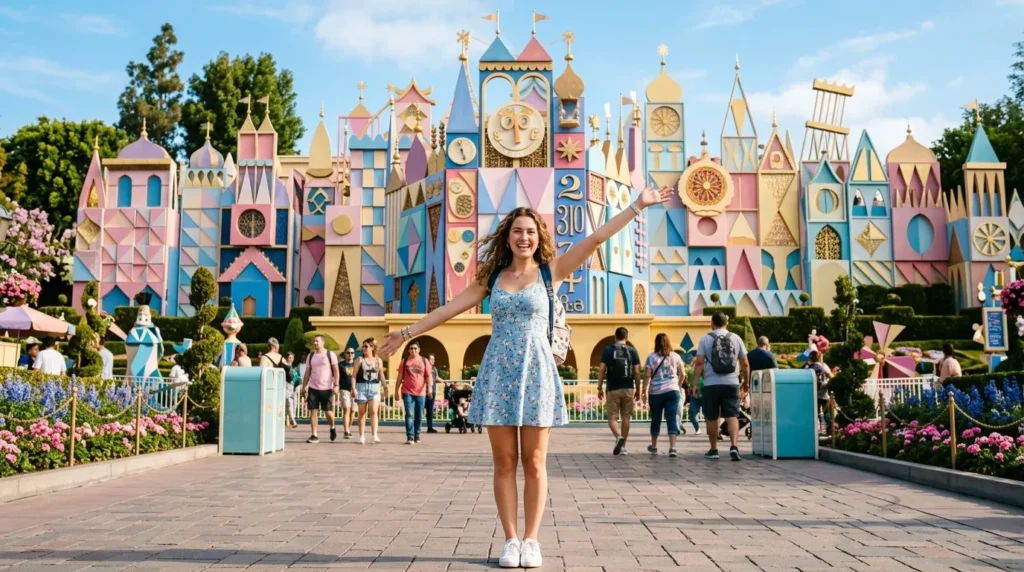
The “it’s a small world” façade is basically a built-in Pinterest backdrop. Use bold, simple poses so the colorful background stays the star. Checklist: stand centered, arms out like a joyful “ta-da,” feet slightly apart, big smile. Try shooting slightly wide so you capture the geometric shapes and bright palette. This area can get busy, so aim for off-peak times or let your photographer crop tight for a clean frame.
For your second pose, do a side profile with a soft smile and one hand shading your eyes, like you’re looking up at the details. It adds variety and feels more editorial. If you’re with family, do a “walking line” shot—everyone holding hands, mid-step, laughing. Keep it quick and step aside between takes so you’re not blocking the flow of guests moving through the area.
13) Matterhorn “Snow Day” Angle
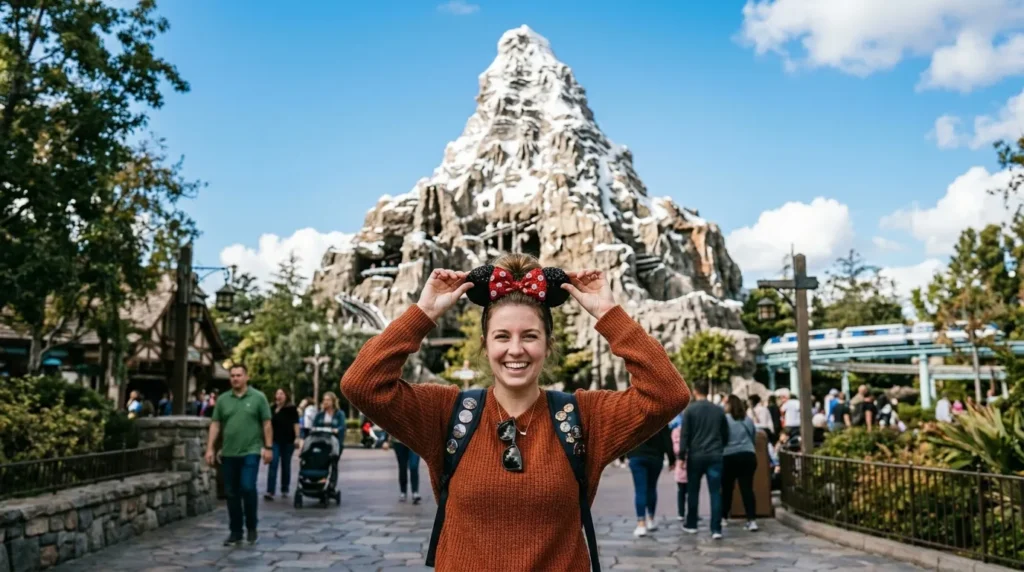
Matterhorn gives you a dramatic, iconic mountain backdrop that feels adventurous. Stand with the mountain behind you and do a confident “explorer” stance: feet planted, shoulders back, relaxed grin. Checklist: keep the mountain visible above your head, avoid busy signs in frame, angle your body slightly, and let your ears be your pop of Disney. A wide shot makes the mountain feel massive, which adds instant story to your photo.
For a second option, try a candid “walk-and-look.” Walk slowly across the open area and glance up at the mountain like you’re spotting it for the first time. Ask your photographer to shoot from a low angle so the peaks look even taller. If the sun is harsh, turn so the light hits your face from the side rather than straight on. This keeps your expression bright without squinting.
14) Jungle Cruise Dock “Explorer” Pose
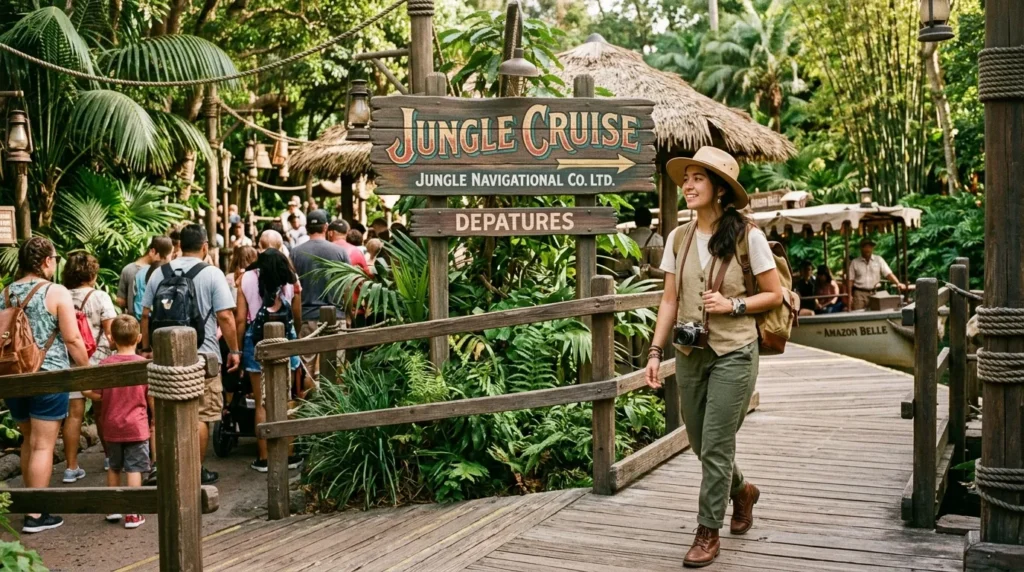
The Jungle Cruise area is perfect for themed photos that still feel natural. Stand near the dock signage or tropical greenery and do a playful explorer pose: one hand shading your eyes like you’re scouting the jungle. Checklist: angle body 45 degrees, keep the sign readable, smile subtle, props minimal. A straw hat or neutral outfit looks great here, but even a simple tee works if you lean into the adventure vibe.
For your second paragraph shot, switch to a candid laugh while holding a map or water bottle, like you’re “prepping for the expedition.” Ask your photographer to step back and include more plants for a lush frame. Avoid blocking queues or entrances—take your shot, then move aside. This location also looks great in soft afternoon light when the greens glow, making your photos feel extra tropical and vacation-like.
15) Adventureland Bamboo Path Portrait
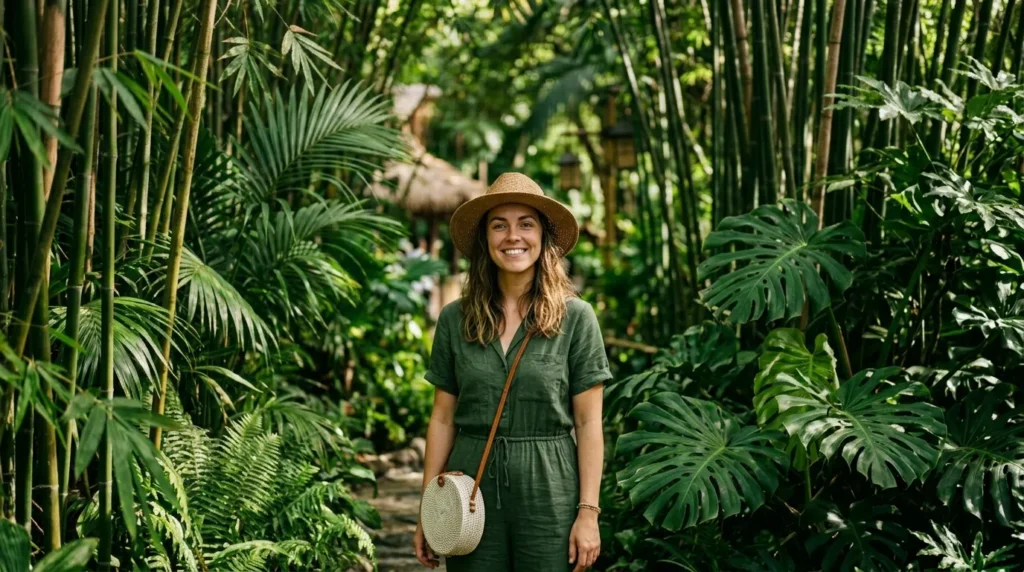
Adventureland pathways can look surprisingly cinematic because of the dense greenery and dappled shade. Find a bamboo-lined spot and do a calm, editorial pose—hands lightly holding your bag strap, eyes toward the camera, soft smile. Checklist: stand in shade, keep background uncluttered, shoulders relaxed, hair tidy. This creates a “travel magazine” vibe that’s different from the bright castle shots and adds variety to your Disneyland photo set.
For the second shot, try a walking candid through the greenery. Walk slowly toward the camera and look to the side like you’re discovering something. Ask your photographer to keep the focus on your face while the plants blur behind you. If it’s crowded, shoot closer and crop tight—green backgrounds still read lush even in small spaces. This is also a great spot for outfit detail shots like ears, bag, and shoes.
16) Tiki Torch Twilight Glow
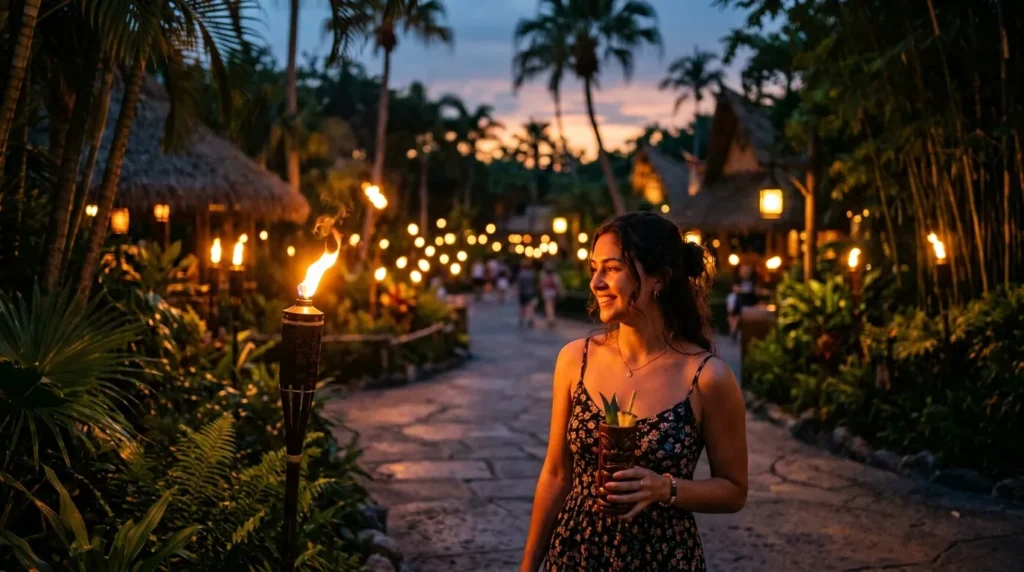
At dusk, tiki torches turn Adventureland into a warm, glowy backdrop that feels like a tropical night market. Stand a few feet away from a torch so it lights one side of your face, then do a simple pose: chin slightly down, eyes toward camera, gentle smile. Checklist: steady hands, no harsh flash, warm tones, background softly blurred. This vibe feels cozy and cinematic, and it’s perfect for “night at Disney” Pinterest boards.
For your second pose, capture a candid moment—hold a Dole Whip or cold drink and laugh while looking slightly off camera. Ask your photographer to expose for the lights so the torches glow without turning your face too dark. If you’re using a phone, tap your face to lock focus, then lower exposure slightly. Be mindful of crowds at night and keep your shoot quick so you’re not stopping traffic.
17) New Orleans Square Iron Balcony Look
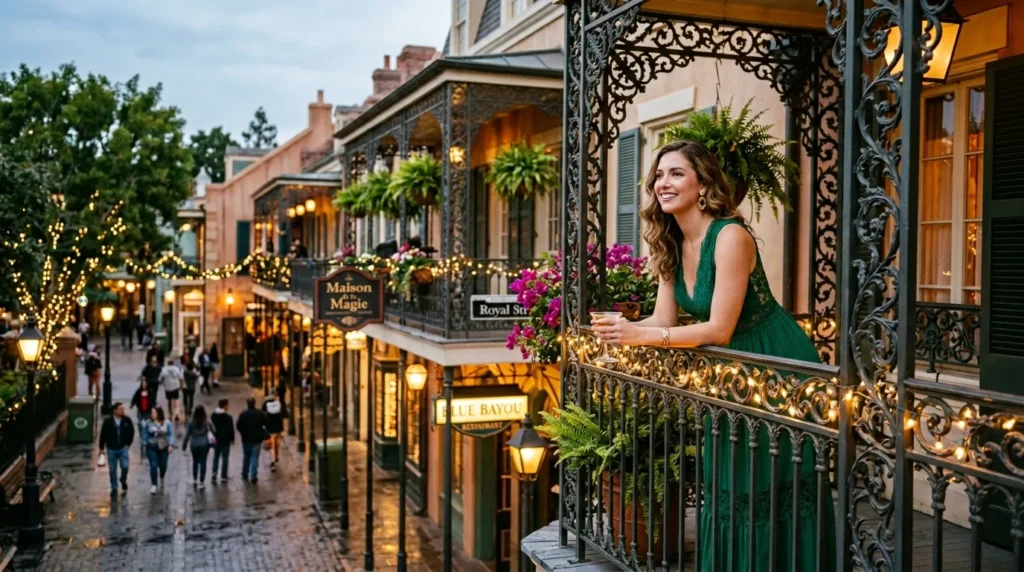
New Orleans Square has elegant ironwork and romantic textures that look amazing in photos. Use the balcony railings and lantern-style lighting as your backdrop. Pose with one hand lightly on the railing and your body turned slightly sideways for a flattering silhouette. Checklist: shoulders relaxed, chin forward, soft smile, bag tucked behind you, background lights visible. This spot creates a classy, timeless Disney look that feels more “travel chic” than theme park.
For the second photo, go for a candid “stroll” shot. Walk slowly along the square, glancing up at the balconies like you’re exploring a historic neighborhood. Evening is best for warm lights, but daytime works too if you keep the frame tight. If your outfit is bright, it will pop beautifully against the darker ironwork. Keep movement natural and avoid posing in doorways or blocking entrances.
18) Pirates Entrance Arch Shadows
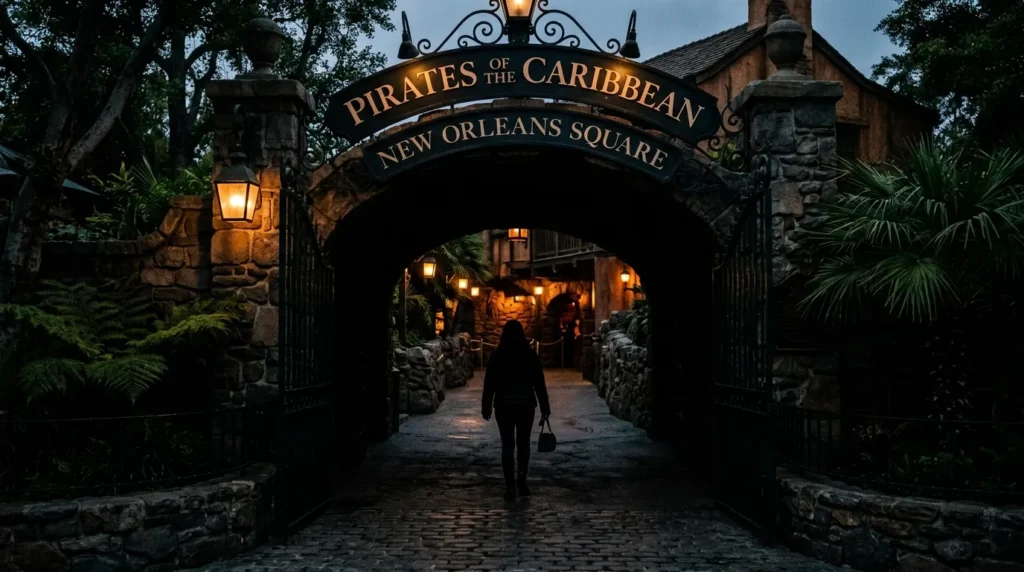
The Pirates entrance area has dramatic archways and shadows that make your photos feel like a movie scene. Stand under the arch and let the light fall behind you for a silhouette-style shot. Checklist: clean outline, arms slightly away from body, one knee bent, head turned profile. This creates a bold, graphic photo that stands out on Pinterest because it’s not the usual bright, sunny Disneyland look.
For your second shot, step just into the light and do a “mysterious traveler” pose—one hand on your bag strap, eyes looking past the camera as if you’re about to board a ship. Ask your photographer to frame the arch around you like a doorway into an adventure. Avoid using flash if it disrupts others, and keep your spot brief so the entrance area stays clear for guests moving through.
19) Haunted Mansion Porch “Spooky Chic”
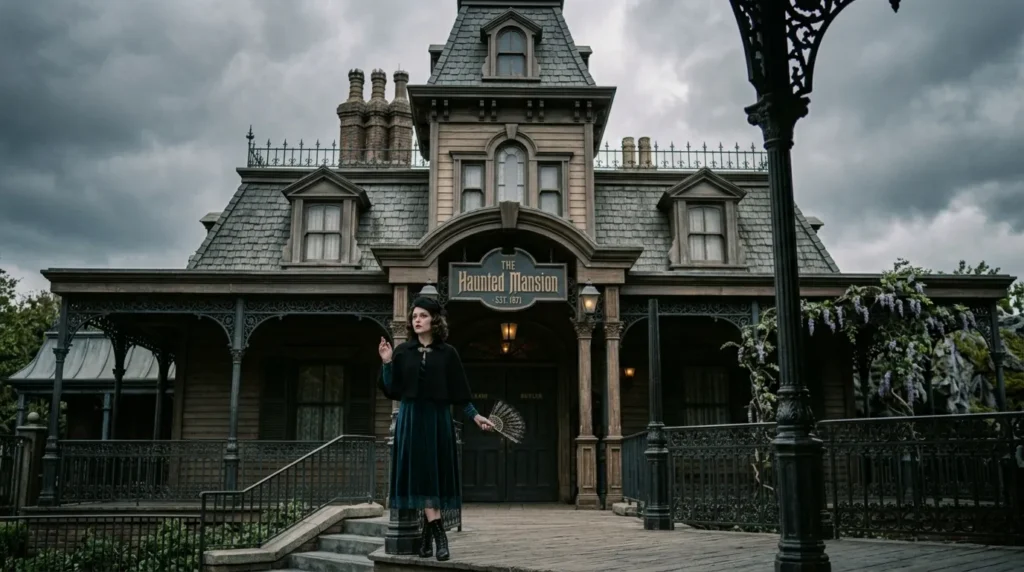
For a creative vibe, go “spooky chic” at the Haunted Mansion exterior. Use the porch rails and gothic details as your backdrop, and pose with a subtle expression—think mysterious, not scary. Checklist: neutral face or slight smirk, hands relaxed, shoulders angled, outfit details visible. This makes your photo feel themed without costumes. If you have a black dress or darker outfit, it looks especially striking against the mansion’s haunted elegance.
For the second pose, do a playful “ghost story” moment: look over your shoulder as if you heard something, then laugh in the next frame. That gives you both cinematic and fun options. Keep your distance from any restricted areas and avoid blocking lines. If you’re using a phone, try portrait mode to blur background crowds and keep the mansion details crisp around you.
20) Mark Twain Riverboat Deck Breeze Shot
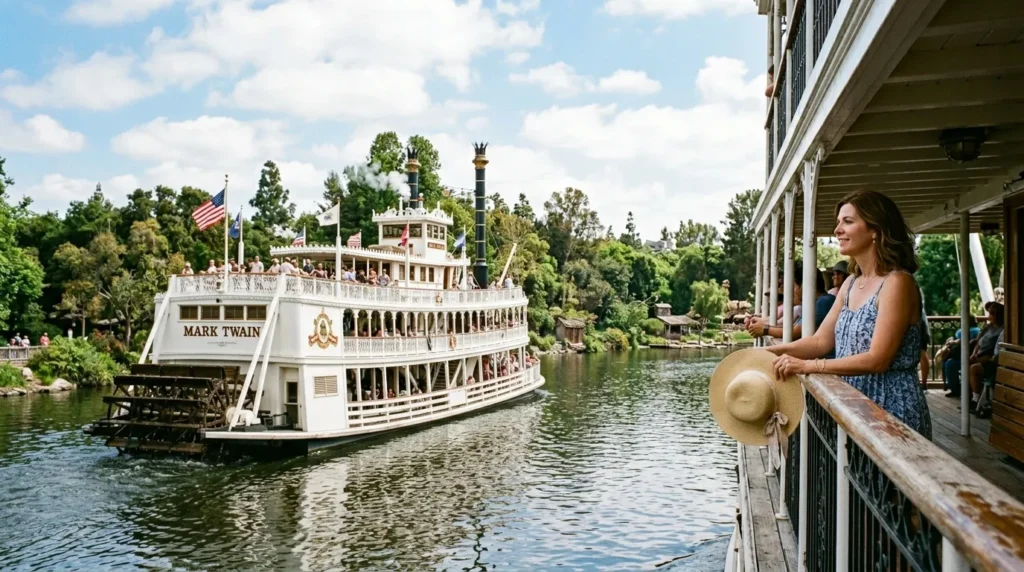
The Mark Twain Riverboat gives you airy, “old-school vacation” photos with water and greenery behind you. Stand on the deck and hold your hat or ears lightly as if catching the breeze. Checklist: face toward light, elbows relaxed, body angled, background includes river. This location feels like a mini escape inside the park and adds variety beyond castle shots. It’s also great for group photos because the deck offers space and depth.
For your second shot, capture a candid laugh while leaning lightly on the railing, looking out at the river like you’re sightseeing. Ask your photographer to shoot slightly upward to include the boat’s structure and flags for that classic riverboat vibe. Keep your stance safe and don’t climb or lean excessively. A simple outfit with one bold accessory—ears, scarf, or bag—photographs beautifully against the boat’s clean lines.
21) Big Thunder Mountain Epic Angle
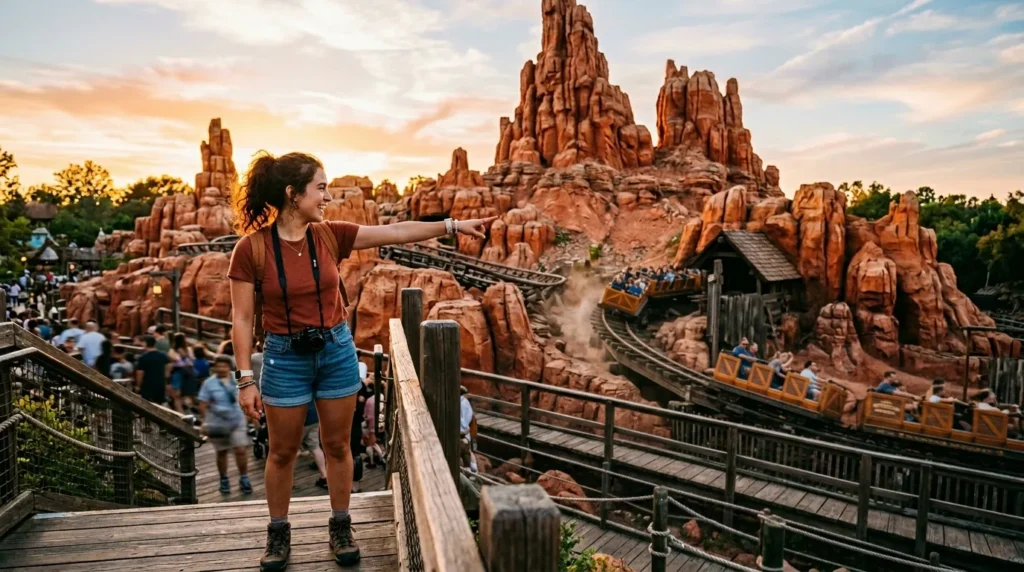
Big Thunder’s rocky landscape looks like a mini desert adventure, especially in warm afternoon light. Stand with the mountain behind you and do a confident “adventure” pose: one hand on your hip, the other pointing toward the ride like you’re about to hop on. Checklist: keep the peak visible, avoid crowded signage, angle your body slightly, smile big. A wide shot makes the rocks feel huge and cinematic—great for Pinterest travel boards.
For the second photo, switch to a softer pose: look up at the mountain with a calm smile, hands holding your bag straps. Ask your photographer to shoot from a lower angle for drama. If you want extra texture, capture a close-up with the rocks blurred behind you. Try this near golden hour for the most flattering light. Be mindful of queues and keep pathways clear—take your shot, then step aside.
22) Tomorrowland Neon Night Lines
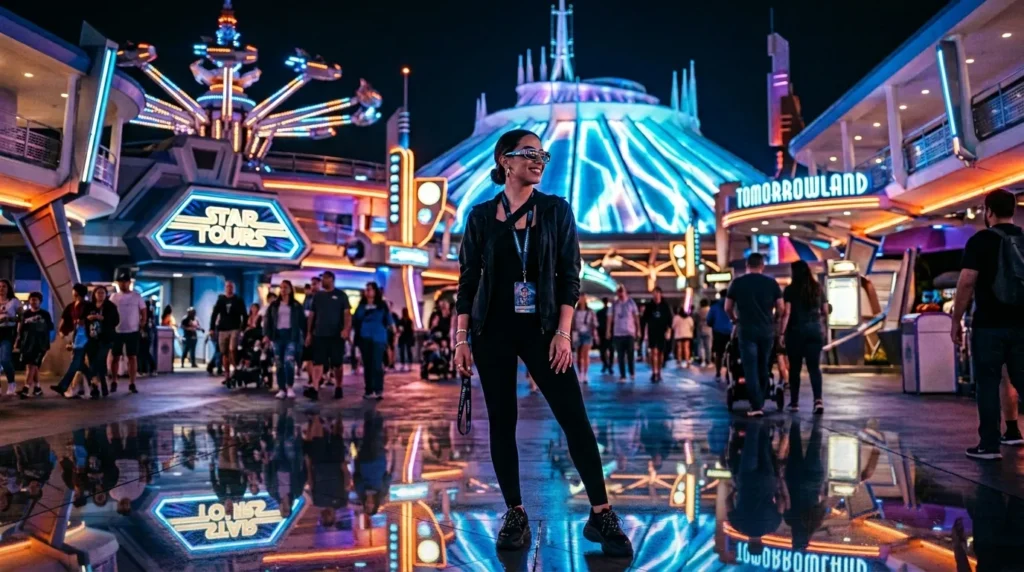
Tomorrowland at night delivers futuristic, neon-lit photos that feel totally different from daytime. Find a spot with strong lines and glowing signs, then pose with a sleek stance: feet slightly apart, shoulders back, chin up. Checklist: no harsh flash, keep neon readable, shoot slightly low, let lights frame you. A darker outfit helps you stand out without competing with the bright background, and the vibe instantly feels editorial.
For the second pose, try a “walking through neon” candid. Walk toward the camera and look to the side as if you’re exploring a sci-fi city. Ask your photographer to use portrait mode or a wider lens to capture the glowing environment. If you’re using a phone, lower exposure a touch so lights don’t blow out. Keep your shoot quick and move out of busy lanes—Tomorrowland paths fill up fast at night.
23) Fireworks/Projections Silhouette at the Castle
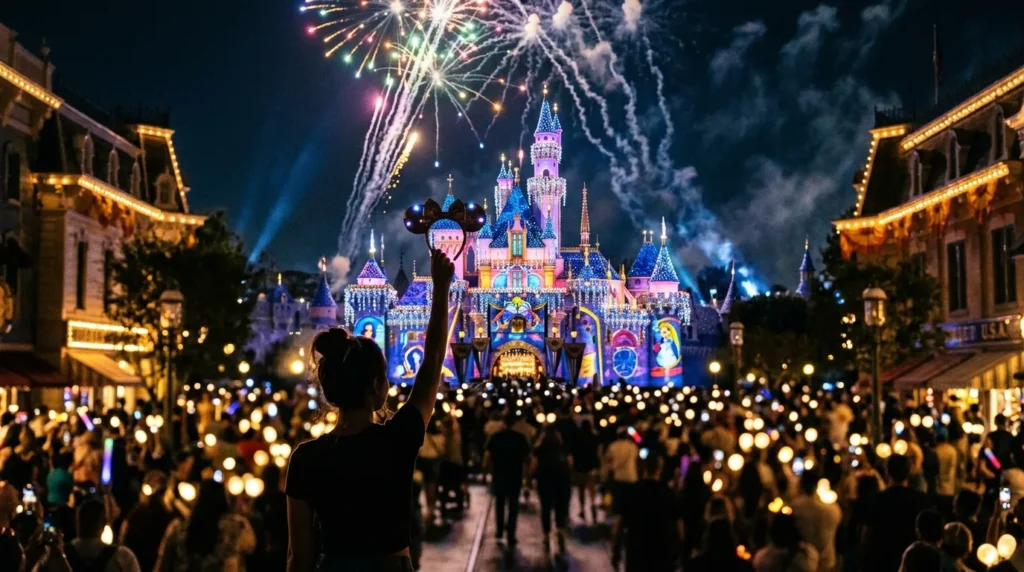
A silhouette during fireworks or projections creates a dramatic, share-worthy Disney moment. Stand where you’re not blocking anyone’s view, then hold your ears or balloon slightly above shoulder level for a recognizable outline. Checklist: keep arms clean and simple, profile angle, castle centered, camera steady. The silhouette makes the photo feel emotional and timeless, and it works even if the crowd is dense because the dark outline reads clearly.
For your second shot, capture a close-up “reaction” moment right before the finale—look up with a soft smile while the castle glows behind you. Use a friend or PhotoPass if possible, and avoid tripods in crowded areas. If you’re on a phone, tap the castle to focus and slightly lower exposure so fireworks keep detail. Take only a few frames, then enjoy the show—your best photo often comes from a real moment.