

Checklist for Angles and Locations to Try!
1) Café Terrace Corner Shot (Street-Level Story)
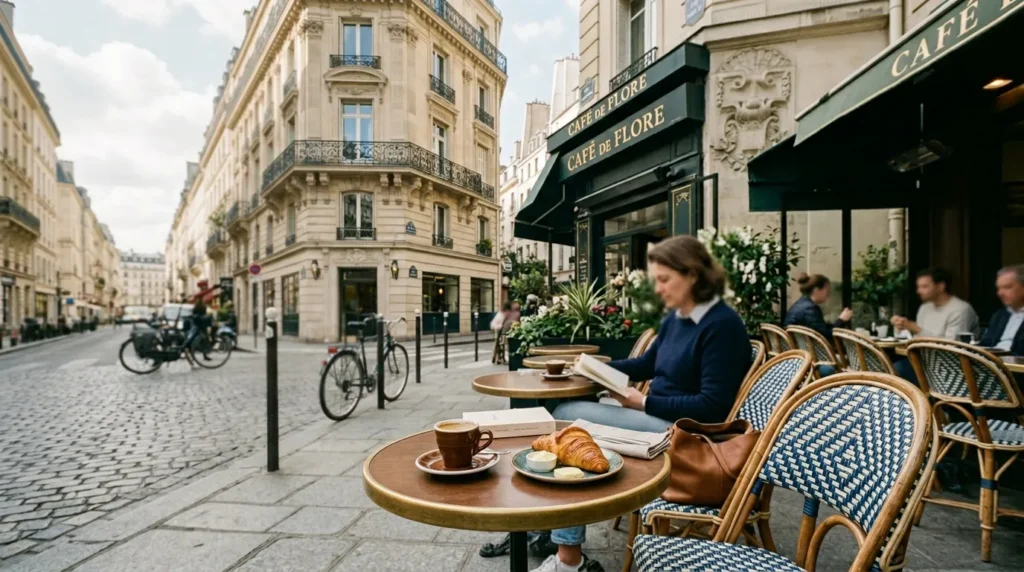
Pick a corner café terrace and shoot from just below table height so chairs, awnings, and coffee cups frame the scene. Angle your camera diagonally toward the street and wait for a small moment—someone crossing, a waiter carrying plates, a scooter passing—so it feels alive. This gives “Paris lifestyle” without needing a landmark, and it works even on busy streets. Early morning is easiest because terraces are calmer and the light stays soft. Keep the frame vertical, hold steady, and capture three variations so you can pick the cleanest one later.
For a more editorial look, simplify the props: one espresso, one pastry, one chair pulled out like someone just sat down. Use portrait mode (or a wide aperture) to blur the background, then tap to expose for the highlights on the cup and plate. If the frame still feels busy, crop tighter on textures—rattan, marble, and the café logo on the awning. Beautiful café terraces are a signature Paris visual, so let the details do the storytelling. Edit lightly: warm tones, softer contrast, and lifted shadows look very Paris.
2) Haussmann Facades From Below (Symmetry + Balconies)

Paris looks “Parisian” because of its classic architecture, so treat a Haussmann façade like your main subject. Stand across the street and tilt up until the balconies stack in repeating lines, but keep verticals straight using your grid. Instead of tilting wildly, step back and zoom a touch to avoid warped edges. Corner buildings are especially photogenic because their curves create a natural sweep through the frame. For Pinterest, leave clear negative space, avoid clutter, and take a wide, medium, and close shot so you have options for covers, pins, and stories too.
Shoot when the sky is pale—after sunrise or before sunset—so stone textures and ironwork pop without harsh contrast. Add one foreground element for depth: a street lamp, leafy branch, or café sign at the bottom edge. If people keep walking through, don’t fight it—let them become tiny scale markers, not the focus. The goal is clean geometry: balconies, windows, and cream stone forming a pattern that feels effortless and timeless. In editing, reduce highlights on stone and glass, brighten faces, and keep colors muted; a touch of grain makes the scene feel timeless today.
3) Covered Passages (Leading Lines + Glass Roof Glow)
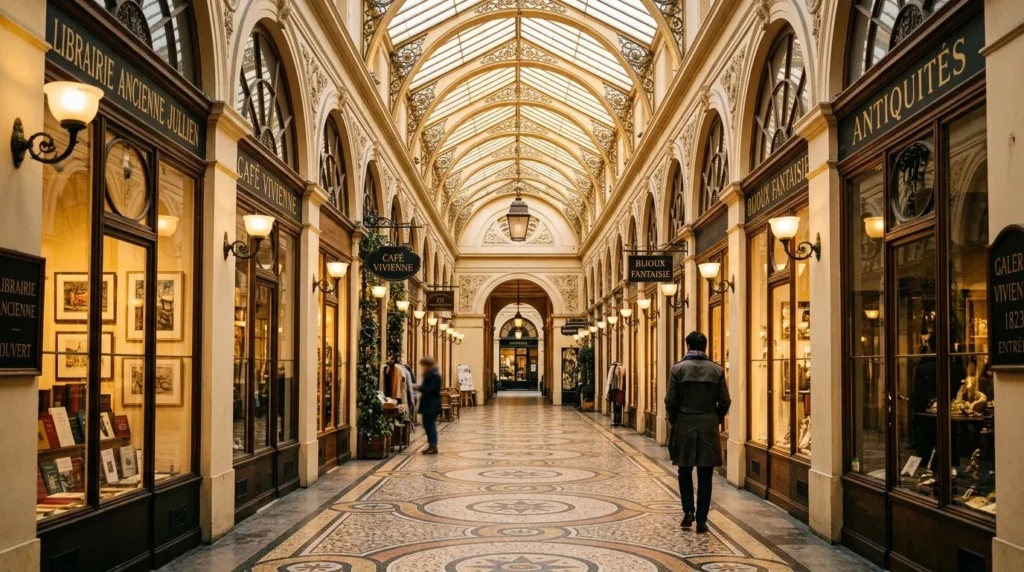
Paris’s covered passages are made for aesthetic photos because the corridor lines automatically guide the eye. Stand centered, frame the ceiling so the glass roof and lights pull you forward, then shoot one perfectly symmetrical image. After that, shift slightly to one side and shoot again for a more candid “walking through” perspective. These spaces glow on overcast days because the light turns soft and even, with no harsh shadows. Keep the frame vertical, hold steady, and capture three variations so you can pick the cleanest one later. (La Marinière Travels)
For a cinematic feel, wait for one person to enter the center and capture them mid-stride for scale. Keep your shutter a bit faster for crisp lines, or slightly slower if you want gentle motion blur in the background. Covered passages like Galerie Vivienne are often listed among the most photogenic Paris spots, so they’re an easy win when streets feel crowded. In edits, lower highlights, lift shadows, and add gentle grain for a dreamy film vibe afterward, always too. (La Marinière Travels)
4) Louvre Pyramid (Reflections + Clean Frames)
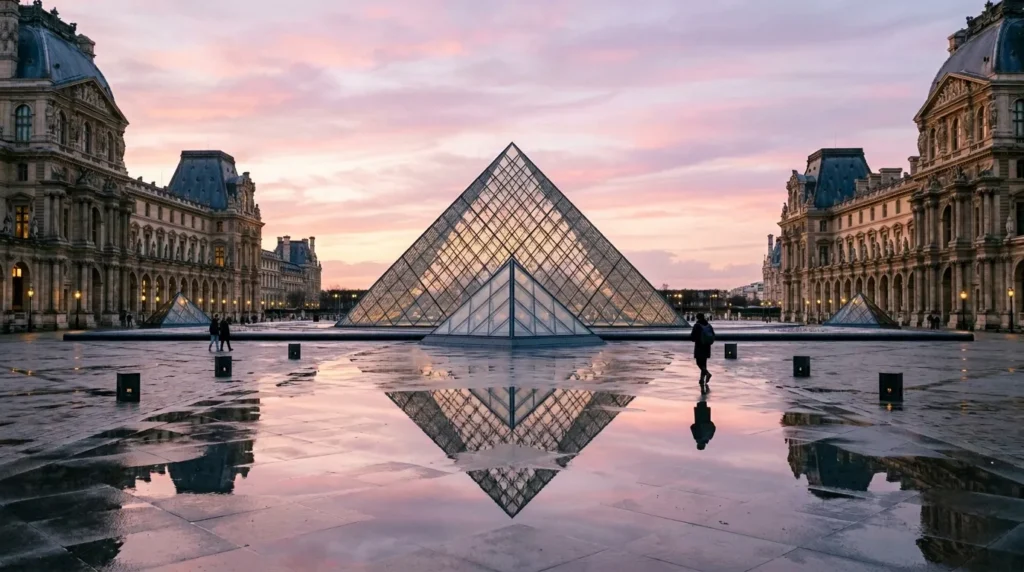
For the Louvre Pyramid, the most “Paris editorial” trick is reflection. After rain, look for puddles on the stone and shoot low so the pyramid mirrors cleanly, making the shapes feel double and dramatic. Keep the pyramid centered for symmetry, and use the courtyard lines to straighten your frame. If crowds are heavy, zoom slightly and crop the edges so the scene reads intentional, not chaotic. For Pinterest, leave clear negative space, avoid clutter, and take a wide, medium, and close shot so you have options for covers, pins, and stories too.
Capture two versions: a wide shot that shows the full courtyard, and a tighter shot focusing on triangle geometry and glass lines. If the light is harsh, move into open shade or shoot early when shadows are softer. Slightly underexpose to protect highlights on the glass, then lift shadows later if you edit. Minimalism is the vibe here—clean lines, soft color, and one strong subject. In editing, reduce highlights on stone and glass, brighten faces, and keep colors muted; a touch of grain makes the scene feel timeless today.
5) Pont Alexandre III (Lamp Posts + Blue Hour Drama)

Pont Alexandre III is pure Paris glamour, and the easiest winning angle is straight down the line of lamps. Stand near the side rail and align lamp posts so they repeat into the distance, creating depth and rhythm. Blue hour (right after sunset) makes the lights glow while the sky stays soft, giving your photos a dreamy, movie-scene mood. From the bridge you can also frame big landmarks in the distance without fighting the biggest crowds. Keep the frame vertical, hold steady, and capture three variations so you can pick the cleanest one later. (parispass.com)
Take one photo perfectly centered for symmetry, then one slightly off-center for a more “editorial stroll” feel. If you have a person, place them between two lamps and let the bridge frame them like a runway. Many guides call Pont Alexandre III one of Paris’s most decorative, photogenic bridges, so it’s a high-impact location for your checklist. In edits, lower highlights, lift shadows, and add gentle grain for a dreamy film vibe afterward, always too. (parispass.com)
6) Sunrise on Pont des Arts (Soft Light + Quiet City)
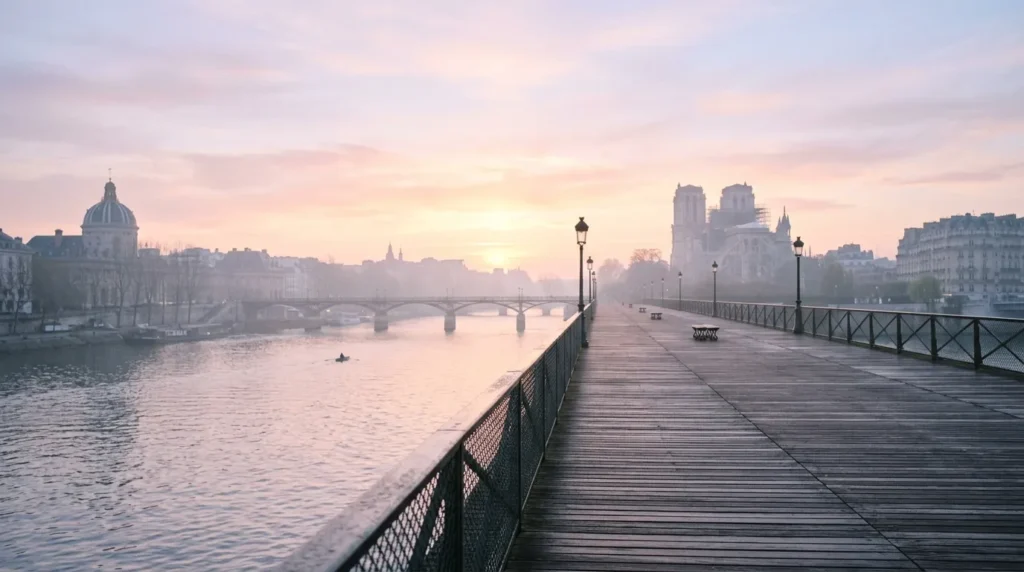
If you want “Paris but peaceful,” shoot a Seine bridge at sunrise when the city feels quieter and the light turns gentle. On Pont des Arts, use the railing as a leading line and keep the river and skyline softly layered behind it. A wide frame feels cinematic when the air is slightly hazy and the colors stay pastel. This is also the easiest time to capture photos without crowds turning your background into visual noise. For Pinterest, leave clear negative space, avoid clutter, and take a wide, medium, and close shot so you have options for covers, pins, and stories too. (Photographer Paris)
For variety, take one shot with a subject walking away, and another focused on hands holding coffee with the river blurred behind. Keep your palette muted by avoiding harsh midday sun and bright neon outfits. If you can, include a tiny detail like a bicycle or book to add story without clutter. Some local photo guides highlight sunrise bridge views as a top Paris photo moment, so it’s worth the early alarm. In editing, reduce highlights on stone and glass, brighten faces, and keep colors muted; a touch of grain makes the scene feel timeless today. (Photographer Paris)
7) Rue de l’Université Eiffel Peek (Long Lens, Low Crowds)
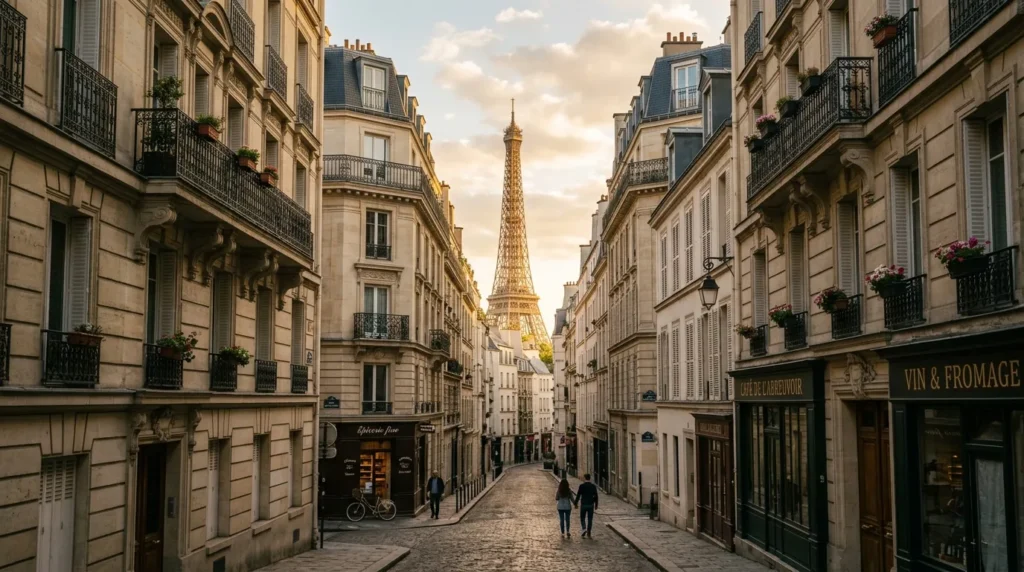
This street is famous because the Eiffel Tower aligns at the end, giving you a clean “peek” shot that feels low-key and romantic. Stand near the curb, keep buildings balanced on both sides, and use a slight zoom (2x–3x) to compress the scene so the tower looks closer. Wait for a single person, bicycle, or car to pass through the center to add motion and scale. The result feels like a film still, not a tourist snapshot. Keep the frame vertical, hold steady, and capture three variations so you can pick the cleanest one later. (parispass.com)
Shoot early for fewer people and softer light bouncing off the stone buildings. Lower exposure slightly so the sky behind the tower doesn’t blow out, then brighten shadows later if needed. Try one centered frame for symmetry and one off-center frame with negative space for a Pinterest-friendly layout. Guides often recommend Rue de l’Université for a straight-on Eiffel shot, so it’s a reliable location to pin. In editing, reduce highlights on stone and glass, brighten faces, and keep colors muted; a touch of grain makes the scene feel timeless today. (parispass.com)
8) Trocadéro Steps (Classic Eiffel Symmetry)
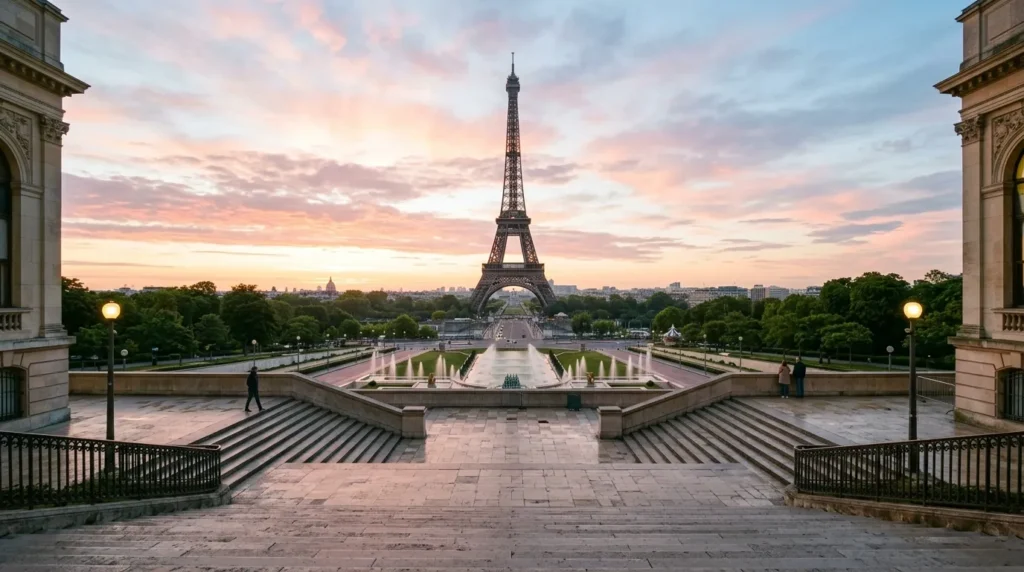
Trocadéro is the classic Eiffel Tower viewpoint, but the aesthetic version is all about timing and clean lines. Arrive early, stand centered on the steps, and use the stair edges to pull the eye straight to the tower. Keep your horizon level and let the tower sit in the middle for that postcard composition. Even a simple phone shot looks “pro” when your geometry is straight and your frame isn’t cluttered. Keep the frame vertical, hold steady, and capture three variations so you can pick the cleanest one later. (Jasmine Alley)
To make it feel less touristy, add a small foreground detail: a coffee cup, bouquet, or coat draped over the railing. Try a slightly lower angle so the steps look grand and the tower feels taller. Then take a second shot from higher up to show more of the plaza for context. Many Paris photo lists call Trocadéro the best Eiffel view, so it deserves a place on your checklist. In edits, lower highlights, lift shadows, and add gentle grain for a dreamy film vibe afterward, always too. (Jasmine Alley)
9) Bir-Hakeim Bridge (Iron Geometry + Movie Vibes)
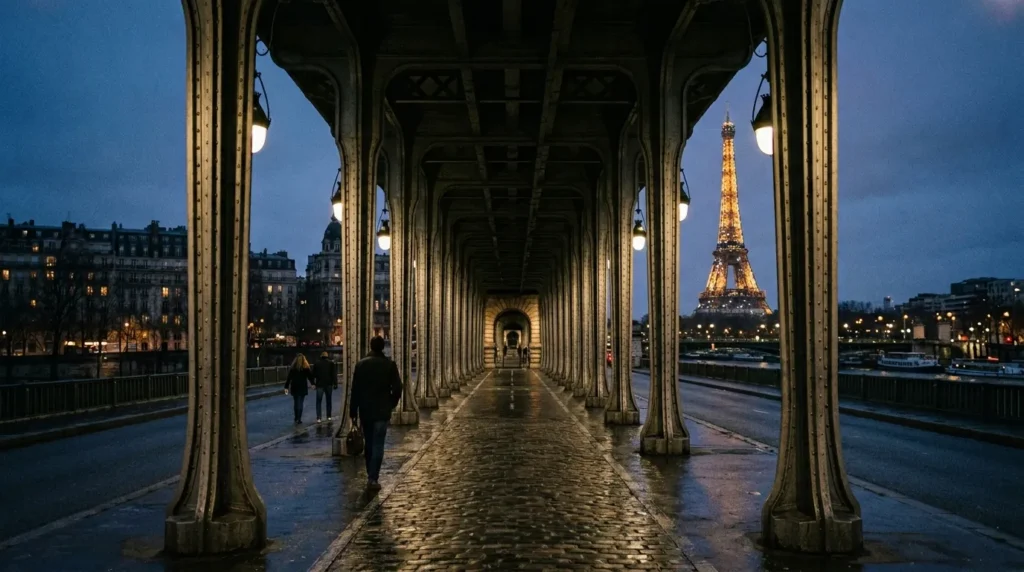
Bir-Hakeim gives you bold structure: repeating iron arches, long corridors, and instant symmetry. Stand in the center of the underpass and frame the arches like a tunnel so your photo looks architectural and cinematic. This location does the styling for you—your only job is to keep the lines straight and the subject small. If you time it right, you can also catch an Eiffel glimpse nearby for extra “Paris” without the crowds. Keep the frame vertical, hold steady, and capture three variations so you can pick the cleanest one later. (Flytographer)
Shoot when the light is softer (morning or late afternoon) so shadows aren’t too harsh under the bridge. Add one person walking through the frame to show scale, or shoot the space empty for a minimalist look. If trains or cars pass above, the distant sound adds to the mood even if you can’t see them. Many professional photo guides recommend Bir-Hakeim for its structure and views, so it’s worth planning in. In edits, lower highlights, lift shadows, and add gentle grain for a dreamy film vibe afterward, always too. (Flytographer)
10) Champ de Mars Lawn (Foreground Layers + Scale)
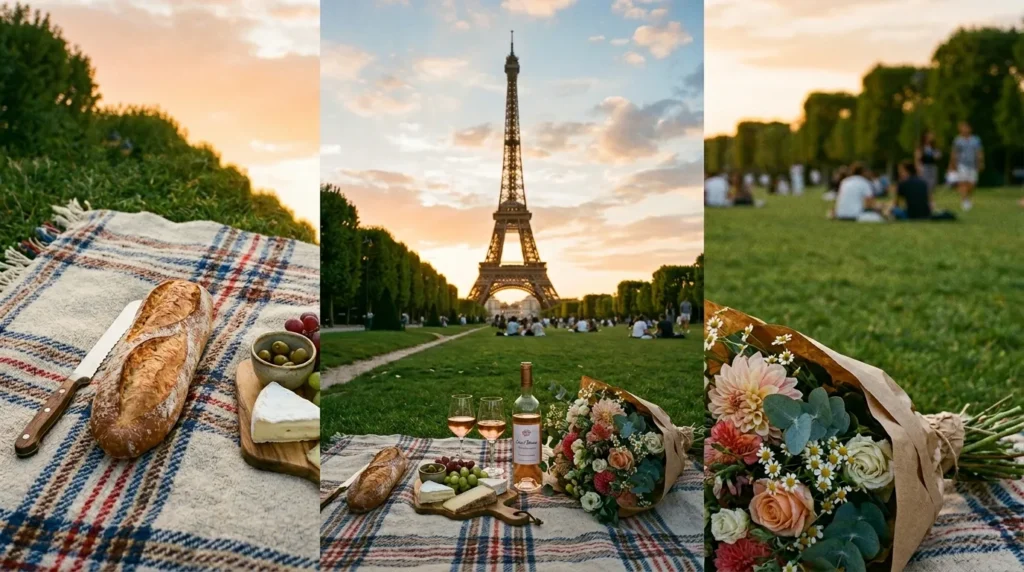
Champ de Mars is perfect for “soft Paris” photos because the lawn creates natural leading lines toward the Eiffel Tower. Build a foreground—picnic blanket, baguette, flowers, or a book—then place the tower slightly off-center for a relaxed, editorial feel. This turns a landmark into a lifestyle scene, which performs well on Pinterest. Golden hour warms the tones and makes the grass and skin look richer, especially in vertical framing. Keep the frame vertical, hold steady, and capture three variations so you can pick the cleanest one later. (Flytographer)
Shoot low so the foreground becomes part of the story, then take a second shot standing up for a wider view. If crowds are heavy, frame tighter and let people become a soft background texture, not the focus. Try one portrait-style pose and one candid “laughing mid-bite” moment for variety. Photo guides often recommend Champ de Mars for Eiffel photos from dawn to dusk, so it’s a reliable place to practice angles. In edits, lower highlights, lift shadows, and add gentle grain for a dreamy film vibe afterward, always too. (Flytographer)
11) Montmartre Cobblestone Curves (Rue de l’Abreuvoir)
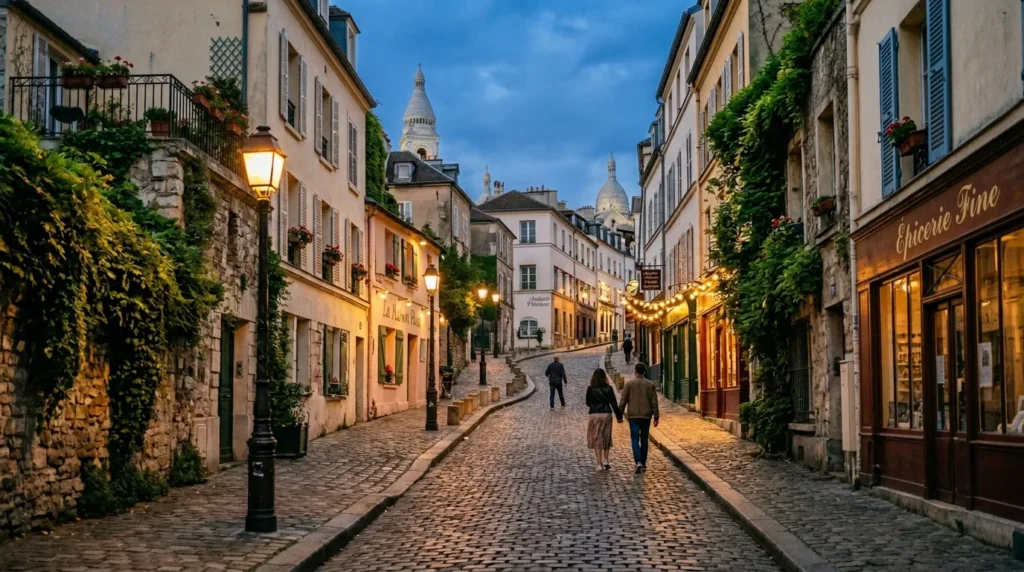
Montmartre is made for aesthetic photos: cobblestones, quiet curves, and neighborhood charm. On Rue de l’Abreuvoir, shoot from the lower end so the curve of the street sweeps upward and guides the eye. This angle feels romantic even without a major landmark, because the texture and slope create movement. Early morning or blue hour works best—fewer people, softer light, and street lamps that add warmth to the scene. Keep the frame vertical, hold steady, and capture three variations so you can pick the cleanest one later. (La Marinière Travels)
Take a “walking away” shot for motion, then a close detail shot of cobblestones and ivy for texture. Keep colors muted and let warm lamps or pastel walls provide the accent. If the street feels busy, wait for a small gap and shoot quickly, then step aside respectfully. Many photo spot lists include Montmartre alleys and Rue de l’Abreuvoir as highly photogenic, so it’s a strong location for your checklist. In edits, lower highlights, lift shadows, and add gentle grain for a dreamy film vibe afterward, always too. (La Marinière Travels)
12) Sacré-Cœur Steps (Crowd Blur + Wide Skyline)

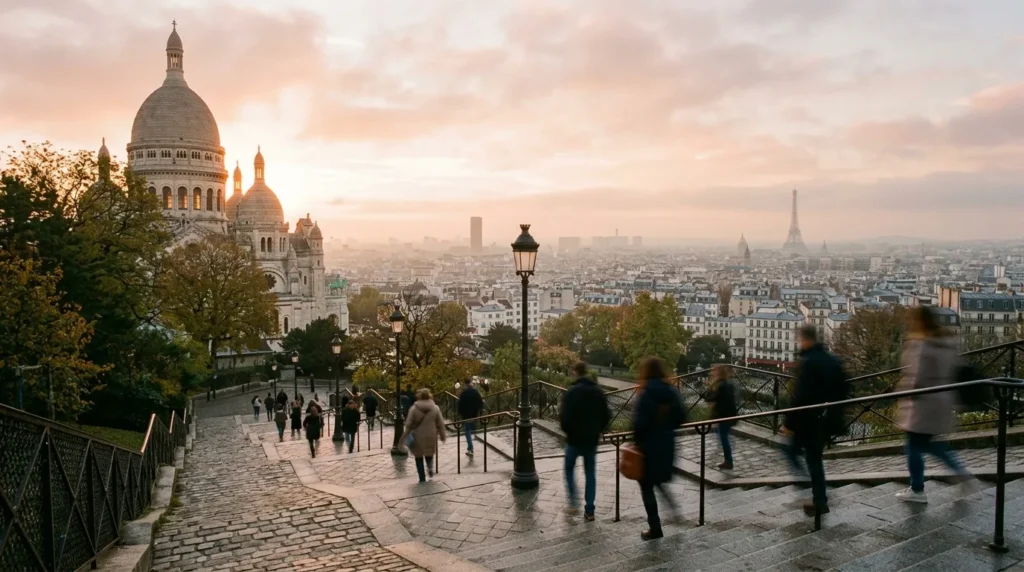
The Sacré-Cœur area is perfect for a “big view” shot with the Paris skyline stretching behind your subject. Use a wide angle and place the horizon in the upper third so the steps and people create foreground energy. If it’s crowded, embrace it: capture gentle motion blur so the basilica and skyline feel solid while the crowd becomes atmosphere. That contrast looks intentional and gives your photo a dreamy, cinematic “travel day” feeling. Keep the frame vertical, hold steady, and capture three variations so you can pick the cleanest one later.
For a calmer look, shoot from the side stairs and use railings as leading lines into the view. Keep your colors soft by avoiding midday glare, and let the sky do the mood work. Take one wide shot focused on the skyline, then one portrait of your subject looking out over the city. This spot is also great for candid moments—street musicians, sunsets, and textured stone steps add story without props. In edits, lower highlights, lift shadows, and add gentle grain for a dreamy film vibe afterward, always too.
13) Art Nouveau Metro Entrance (Guimard Close-Ups)
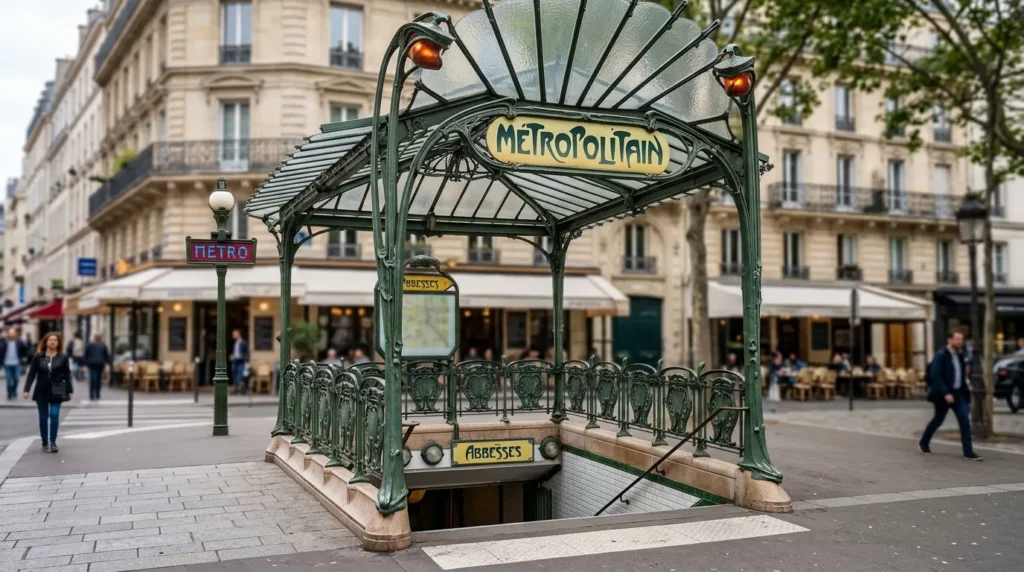
Paris’s Art Nouveau metro entrances are iconic and instantly readable, which makes them perfect for “Paris details” photography. Stand slightly off-center and shoot upward so the curved ironwork frames the “METRO” sign like a crown. Then take a tighter close-up of the lettering and floral shapes for a design-focused shot that looks great in a Pinterest pin. This is also a smart option when you want a Paris vibe without fighting landmark queues and crowds. Keep the frame vertical, hold steady, and capture three variations so you can pick the cleanest one later. (parisinsidersguide.com)
Shoot in open shade or on an overcast day so the green metal color stays rich and highlights don’t blow out. If people pass behind, let them blur slightly to add city energy without stealing attention. Hector Guimard’s metro designs date back to 1900 and remain a signature Paris symbol, so it’s a meaningful location choice for your checklist. In edits, lower highlights, lift shadows, and add gentle grain for a dreamy film vibe afterward, always too. (parisinsidersguide.com)
14) Opéra Garnier Staircase (Luxury Perspective)
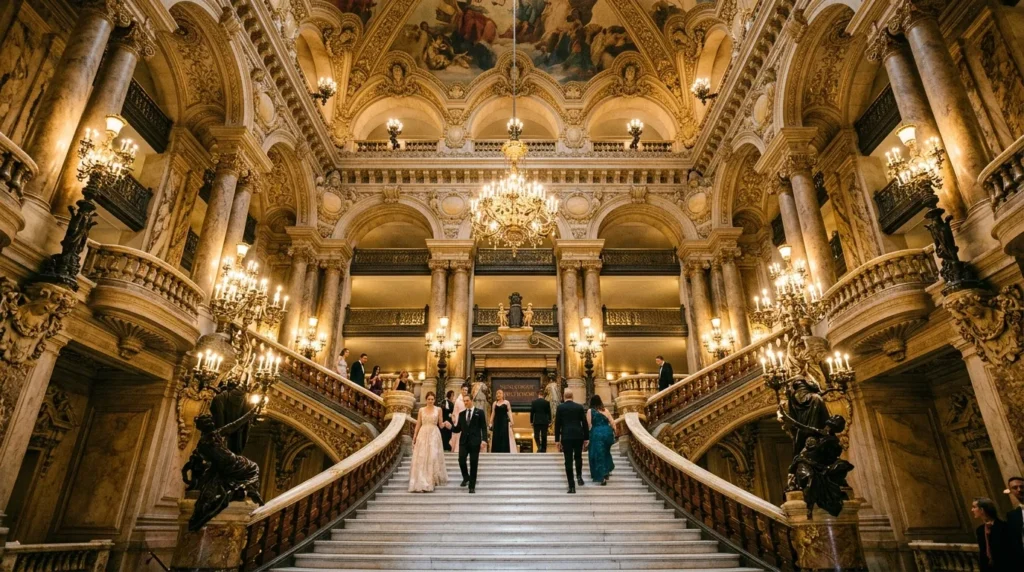
For instant Paris luxury, shoot inside Opéra Garnier using a staircase perspective. Stand at the bottom and angle upward so the banister becomes a leading line and the marble steps create depth. Vertical framing helps you capture the height and drama without needing a super-wide lens. Wait for one person to enter the frame in a neutral outfit; their small size makes the architecture feel even grander and more cinematic. Keep the frame vertical, hold steady, and capture three variations so you can pick the cleanest one later. (La Marinière Travels)
Indoor light can be dim, so steady your hands and take a few shots to avoid blur. Expose for the bright gold details so the scene looks rich, not washed out, and let shadows stay slightly moody. Try one centered composition for symmetry and one diagonal for movement. Many Paris photo spot lists highlight Opéra Garnier’s interiors as a top place for dramatic architecture photos, so it’s worth adding to your route. In edits, lower highlights, lift shadows, and add gentle grain for a dreamy film vibe afterward, always too. (La Marinière Travels)
15) Galeries Lafayette Dome + Rooftop (Pattern + Skyline)
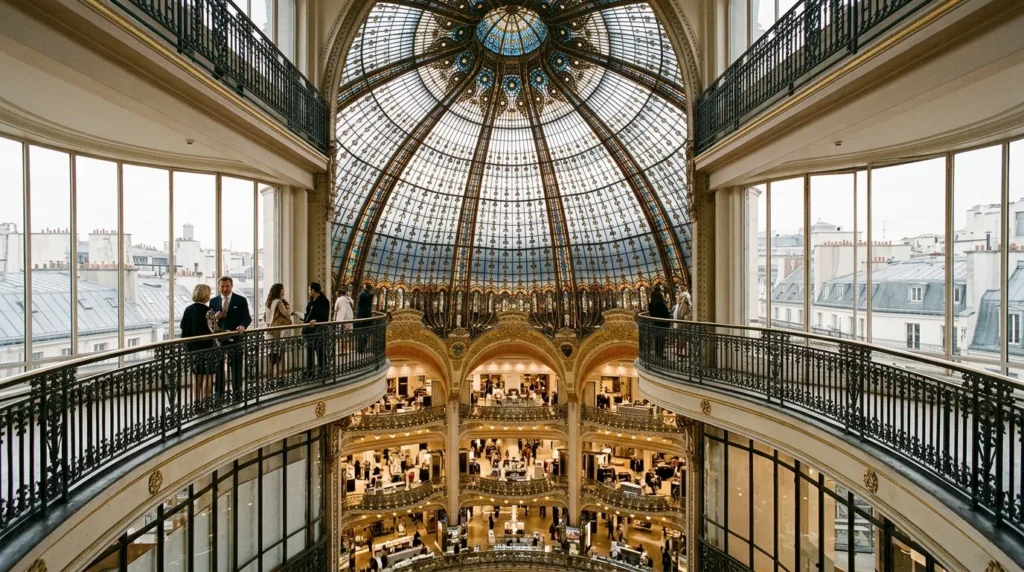
This is a two-for-one location: the dome inside Galeries Lafayette gives you dreamy patterns, and the rooftop gives you skyline views. For the dome, go to an upper level and frame the glass so the geometry fills the top of your shot. Include a small person on the balcony to show scale and add life. The result feels graphic, elegant, and instantly “Paris,” especially when you keep the composition symmetrical. Keep the frame vertical, hold steady, and capture three variations so you can pick the cleanest one later. (La Marinière Travels)
On the rooftop, use a slight zoom to compress rooftops into layered textures, then add one foreground detail—coffee, scarf, or hand on the railing—for story. Late afternoon light makes the city glow and softens contrast. Many local lists include Galeries Lafayette Haussmann as both a photogenic interior and a viewpoint, so it’s a strong addition to your checklist. In edits, lower highlights, lift shadows, and add gentle grain for a dreamy film vibe afterward, always too. (La Marinière Travels)
16) Sainte-Chapelle Stained Glass (Tilt-Up Awe Shot)
Sainte-Chapelle is the ultimate “wow” interior, and the best angle is a gentle tilt upward that shows the height of the stained glass. Stand near the center, keep your camera steady, and let the windows rise from the bottom of the frame into the ceiling. Vertical format is perfect here because the architecture is tall and dramatic. If people are present, include one small figure near the edge for scale instead of waiting forever for emptiness. Keep the frame vertical, hold steady, and capture three variations so you can pick the cleanest one later. (La Marinière Travels)
Light shifts quickly, so take multiple exposures—one protecting the bright glass and one capturing darker details. Avoid flash; it flattens the colors and kills the atmosphere. If your phone struggles, brace against a column or railing to reduce shake. Photo spot guides often list Sainte-Chapelle as one of Paris’s most striking places to photograph, so it’s worth visiting even on a tight itinerary. In edits, lower highlights, lift shadows, and add gentle grain for a dreamy film vibe afterward, always too. (La Marinière Travels)
17) Palais Royal Columns (Playful Stripes + Shadows)

The Palais Royal columns (Colonnes de Buren) are a cheat code for graphic, modern Paris photos. Shoot from above on a step to show the pattern, then do a low angle where the columns tower upward for drama. Midday sun actually works here because it casts bold shadows that look editorial and design-forward. Use the stripes as leading lines, and place your subject between columns so the scene feels playful but still minimal. Keep the frame vertical, hold steady, and capture three variations so you can pick the cleanest one later.
Wear simple tones—black, white, beige—so you don’t compete with the pattern. Try a walking shot weaving through columns, then a still pose with one hand touching a striped post. This installation sits in the Palais Royal courtyard and is known for its many black-and-white columns, making it a reliable “aesthetic location” to save. In editing, reduce highlights on stone and glass, brighten faces, and keep colors muted; a touch of grain makes the scene feel timeless today.
18) Luxembourg Gardens Chairs (Candid Paris Lifestyle)
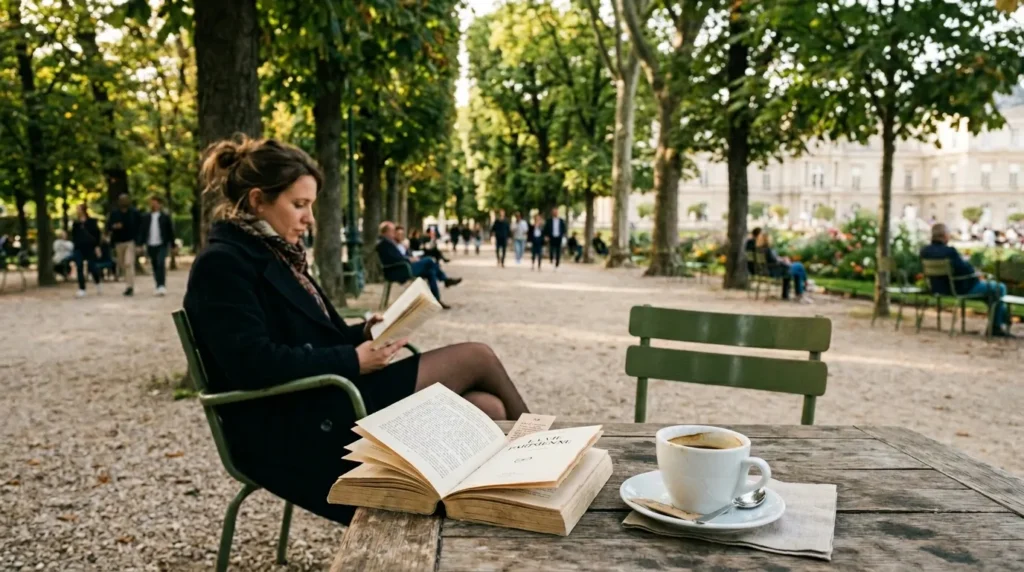
For a relaxed Paris vibe, photograph the small moments in Luxembourg Gardens instead of chasing only landmarks. Frame the iconic green chairs in the foreground and let tree-lined paths fade into soft blur behind them. Shoot from seated height for intimacy, or slightly higher to show repeating chairs as a pattern. This reads as “slow travel” and performs well on Pinterest because it feels calm, cozy, and real. Keep the frame vertical, hold steady, and capture three variations so you can pick the cleanest one later.
Aim for late afternoon when light filters through the trees and softens everything. Bring one simple prop—book, scarf, pastry—to add story without clutter, then keep your background clean. Capture a candid reading moment, a coffee break, and a wide shot of the chair rows for variety. Gardens also make flattering portrait locations because greenery acts like a natural diffuser and keeps skin tones gentle. In edits, lower highlights, lift shadows, and add gentle grain for a dreamy film vibe afterward, always too.
19) Seine Bouquinistes (Texture + Storytelling Details)
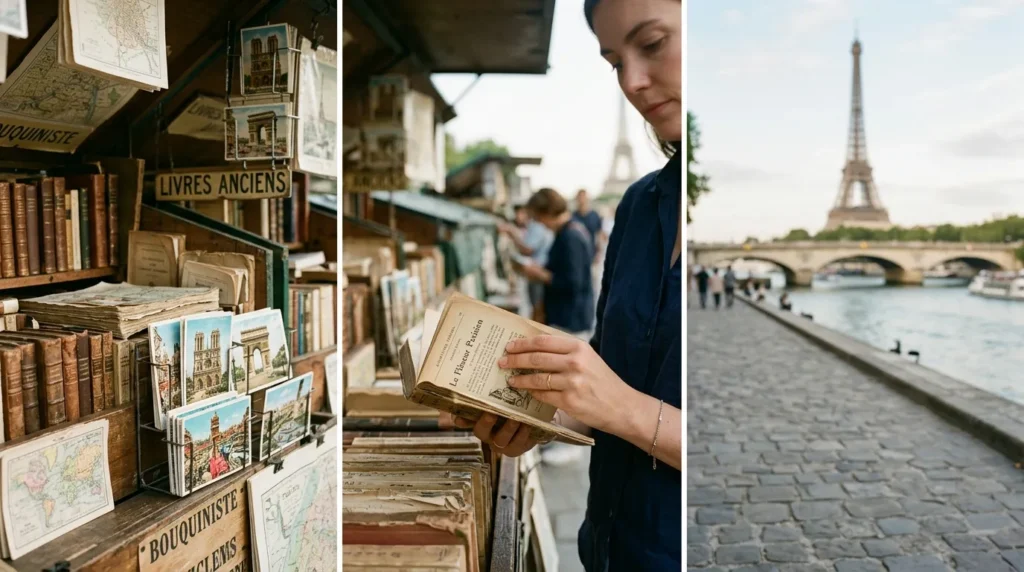
The bouquinistes along the Seine are perfect for detail shots that feel authentically Parisian. Get close to textures: hands flipping postcards, stacks of vintage books, old maps, and the green stall doors. Use shallow depth of field so the background becomes dreamy—maybe river sparkle or a bridge softly blurred. These photos work as beautiful “in-between” shots that make your travel album feel curated, not just landmark-to-landmark. Keep the frame vertical, hold steady, and capture three variations so you can pick the cleanest one later.
Shoot in soft light—morning or late afternoon—so paper textures don’t look harsh or overly contrasty. Take one wide shot showing several stalls in a row, then a tight shot focusing on one book cover and a hand. Keep colors muted and let greens, creams, and browns dominate. This adds Paris mood without crowds, and it’s very Pinterest-friendly for travel boards. In edits, lower highlights, lift shadows, and add gentle grain for a dreamy film vibe afterward, always too.
20) Rainy Paris Reflections (Night Bokeh + Cinematic Shine)
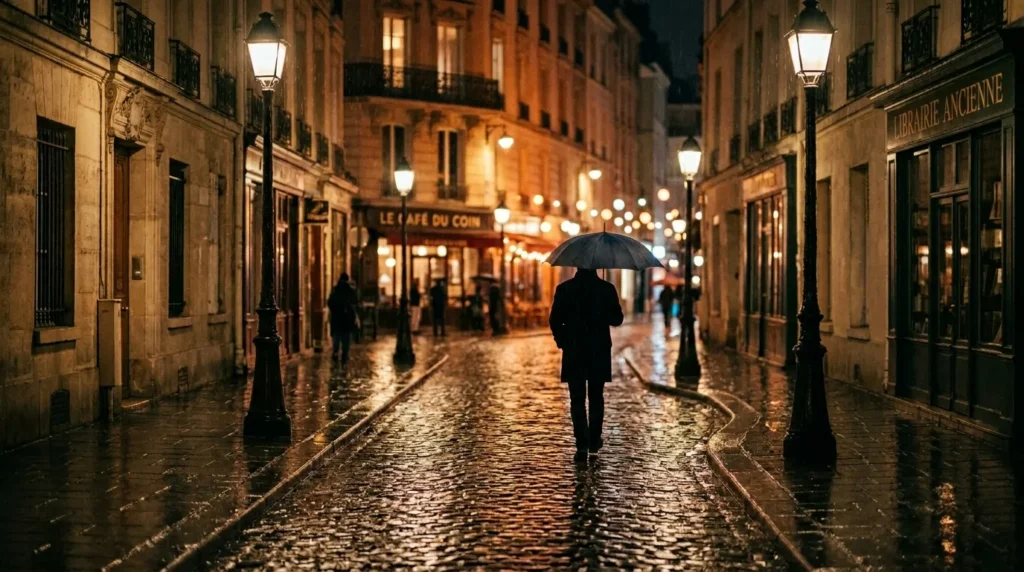
Rain is not a problem in Paris—it’s an aesthetic advantage. After a shower, find wet cobblestones and street lamps, then shoot low so reflections fill the bottom half of your frame. Add an umbrella silhouette for instant story, and let distant lights blur into bokeh for that cinematic night feel. Even a normal street looks romantic when the ground shines and the lamps repeat in a line. Keep the frame vertical, hold steady, and capture three variations so you can pick the cleanest one later.
Tap to focus on the brightest lamp or your subject’s outline, then lower exposure slightly so highlights stay controlled. If your phone has night mode, take one version with it and one without for different vibes. Look for bridges and café streets where lights naturally repeat, creating rhythm in the frame. These shots often become favorites because they feel like a film still—pure, moody Paris energy. In edits, lower highlights, lift shadows, and add gentle grain for a dreamy film vibe afterward, always too.
